Creating handmade home decor brings a special kind of satisfaction that store-bought items simply can’t match. Making your own rug is a DIY project that adds personality and warmth to any space without breaking the bank.
Learning how to make a rug opens up endless creative possibilities for refreshing a living room or crafting unique gifts.
DIY rugs have surged in popularity lately, and for good reason: they’re customizable, budget-friendly, and surprisingly fun to craft.
From essential tools and materials to various rug-making techniques, everything you need to know is covered here. Plus, I’ve included a step-by-step video tutorial to make the process even easier.
Why Make Your Own Rug?
Before diving into the how-to, it’s worth exploring what makes DIY rugs such an appealing project. From creative freedom to environmental benefits, there are plenty of compelling reasons to try making your own rug at home.
- Personalization and Creativity: Design rugs that perfectly match your space and style. Choose colors, patterns, textures, and sizes that complement your existing decor rather than settling for mass-produced options.
- Sustainability and Cost Savings: DIY rug projects can be both eco-friendly and budget-conscious. Repurpose old fabrics, t-shirts, or yarn scraps while saving money compared to expensive store-bought alternatives.
- Therapeutic and Fun: Experience the satisfaction of crafting something with your own hands. The process is meditative, rewarding, and results in a functional piece of art you’ll be proud to display
Different Ways to Make a Rug
There’s no single “right” way to create a DIY rug the beauty lies in choosing a technique that matches your skill level, available materials, and desired aesthetic.
Each method offers unique textures, patterns, and creative possibilities. Here are some of the most popular rug-making techniques to consider for your next project.
1. Tufting
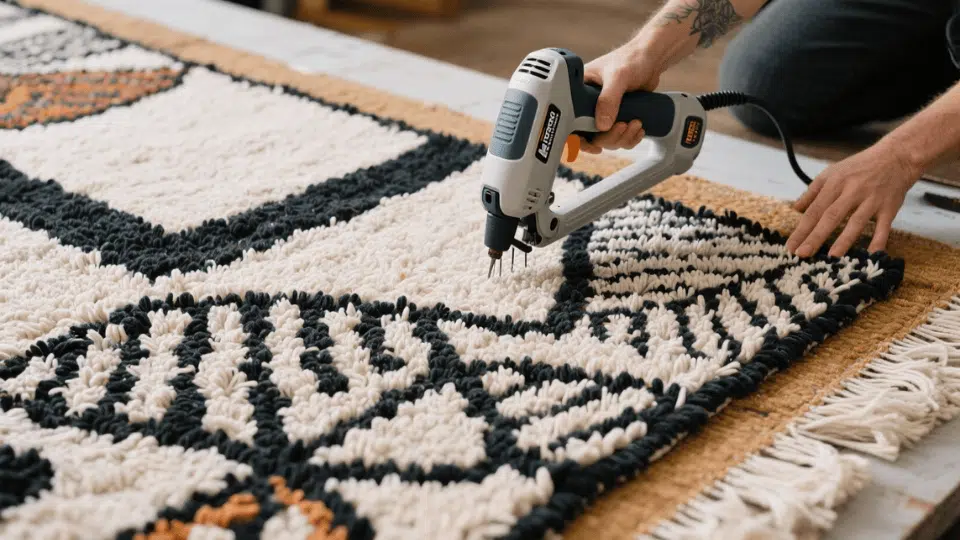
Rug tufting has exploded in popularity thanks to social media, where creators showcase stunning custom designs.
This technique uses a tufting gun an electric tool that punches yarn through a stretched fabric backing to create loops or cut pile textures.
While it requires an initial investment in equipment, tufting allows for intricate designs, bold graphics, and professional-looking results.
It’s perfect for those who want to create statement pieces with modern flair and don’t mind a bit of a learning curve.
2. Latch Hooking
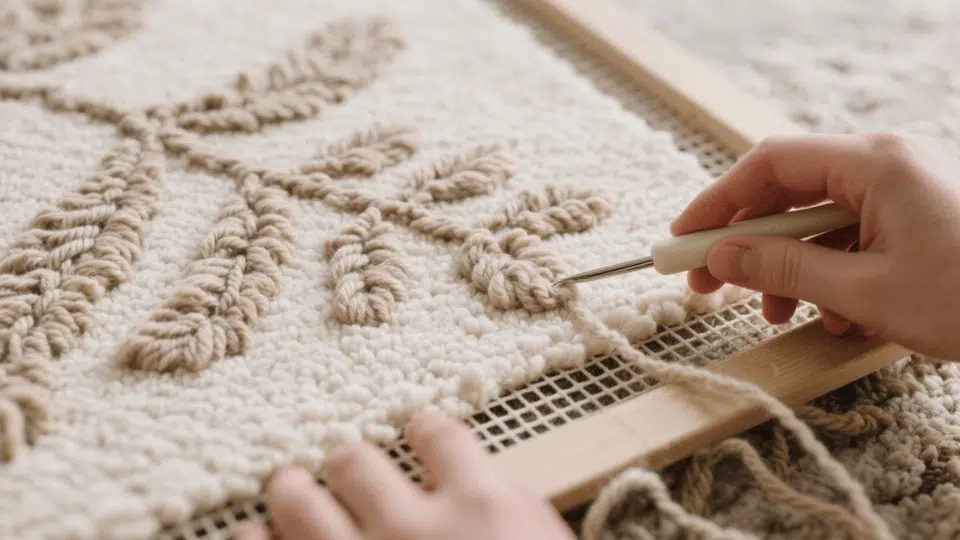
Latch hooking is a traditional, beginner-friendly technique that uses pre-cut yarn pieces and a simple latch hook tool.
The process involves pulling yarn through a mesh canvas to create a thick, plush surface. This method is meditative and requires minimal equipment, making it ideal for crafters of all ages.
Latch hook kits are widely available with pre-printed patterns, or you can design your own custom pieces. It’s a slower process but produces beautifully textured, durable rugs.
3. Weaving
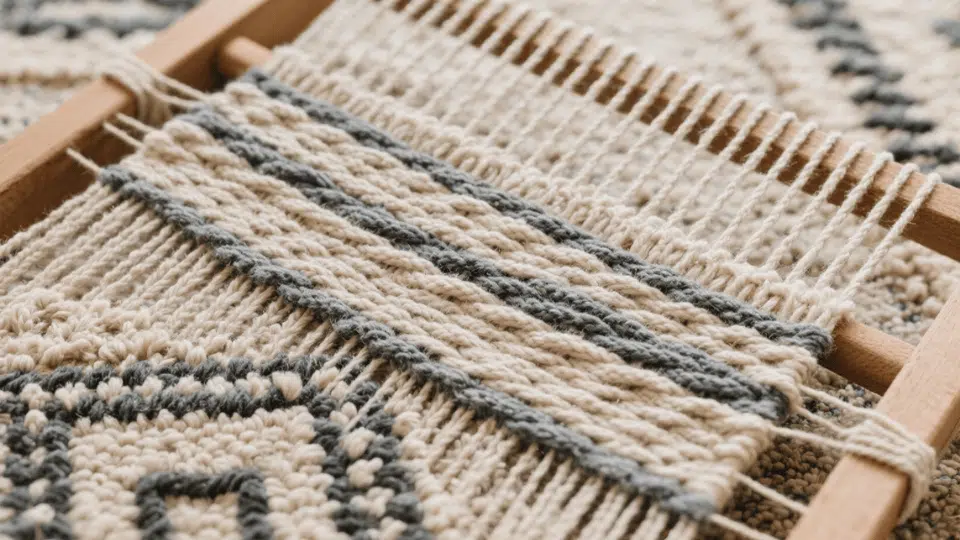
Weaving creates flat, textured rugs with a classic, handcrafted appeal. Using a loom or simple DIY frame, warp threads are strung vertically while fabric strips, yarn, or rope are woven horizontally through them.
This technique offers endless pattern possibilities from simple stripes to complex geometric designs. Woven rugs work beautifully in modern, minimalist, or bohemian spaces.
While it requires some practice to maintain even tension, the results are stunning and long-lasting.
4. Braiding and Knotting
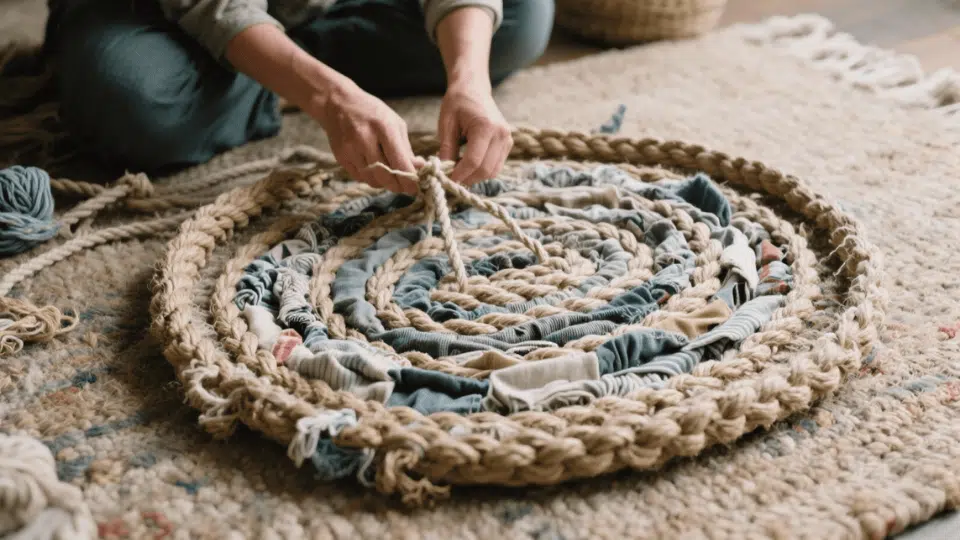
Braiding and knotting techniques give rugs a charming, rustic character that’s perfect for farmhouse or cottage-style homes.
Fabric scraps, old t-shirts, rope, or yarn strips are braided together and then coiled or sewn into circular, oval, or rectangular shapes.
This method is incredibly accessible no special tools required and it’s an excellent way to upcycle materials. The process is forgiving for beginners while still producing cozy, durable rugs with handmade warmth.
Designing Your DIY Rug
Before starting any rug-making technique, planning the pattern, colors, and overall aesthetic ensures a cohesive final product that enhances your space.
Taking time to thoughtfully design your rug prevents mistakes and makes the crafting process smoother.
- Picking a Pattern or Image: Choose designs that suit your space and personality. Consider the room’s existing decor and style geometric patterns for modern spaces, floral motifs for traditional rooms, or abstract designs for eclectic vibes. Start simple if you’re a beginner.
- Transferring Designs onto the Backing: Outline your rug design before starting the actual crafting. Use a projector to trace images onto the backing fabric, draw freehand with fabric markers or chalk, or purchase pre-printed canvases with designs already marked.
- Color Planning: Select yarn colors thoughtfully and understand how texture and contrast work together. Create a color palette with 3-5 complementary shades, use contrast to make key elements pop, and test yarn combinations in different lighting before committing to your final design.
Step-by-Step Rug Making
If you’ve ever wondered how to make a rug or dreamed of making your own rug from scratch, this simple guide will walk you through the entire process. This section is perfect for anyone exploring DIY rug projects or looking for clear steps to create a beautiful, handmade rug you’ll be proud of.
Tools and Materials You’ll Need
Before you start making your own rug, gather the right tools and materials. Having everything ready will make your DIY rug process smoother, safer, and a lot more enjoyable from start to finish.
| Category | Items |
|---|---|
| Main Tools | Rug tufting gun, rug frame (with pre-drilled holes), trimmers, scissors, blade, loop threader |
| Materials | Yarn (any color or texture you like), backing fabric, Elmer’s glue, putty knife |
| Optional Tools | Shearing tool, dog comb blade, spray adhesive, extra fabric for backing |
| Safety Essentials | Power switch (on tufting gun), plug or extension cord, gloves (optional) |
Step 1: Project and Trace Your Design
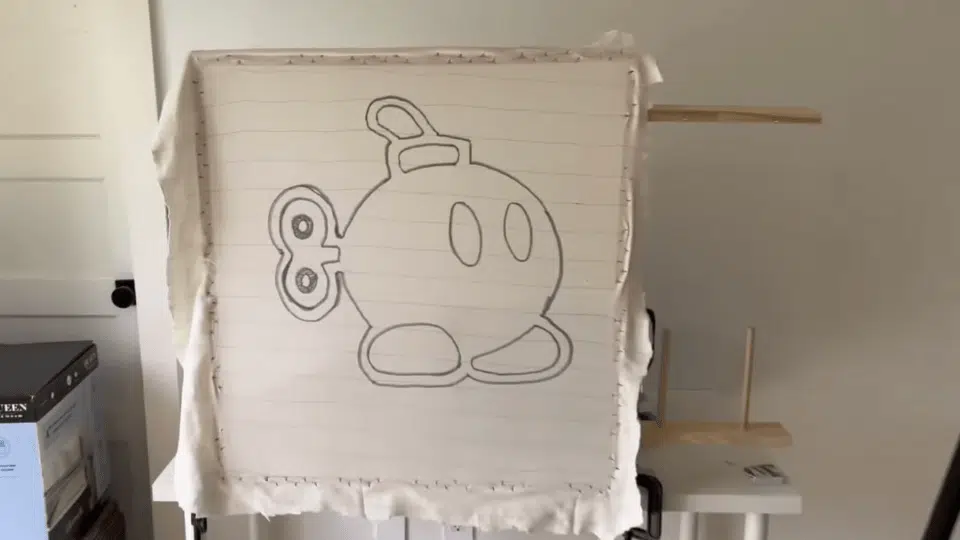
Set up your rug frame on a sturdy, flat surface. To begin making your own rug, project your chosen design or image onto the fabric.
Be sure to flip the image horizontally before tracing so the final design appears correctly on the front side. Trace the outline with a marker. The frame should be easy to assemble, taking about 15 minutes if it’s pre-drilled.
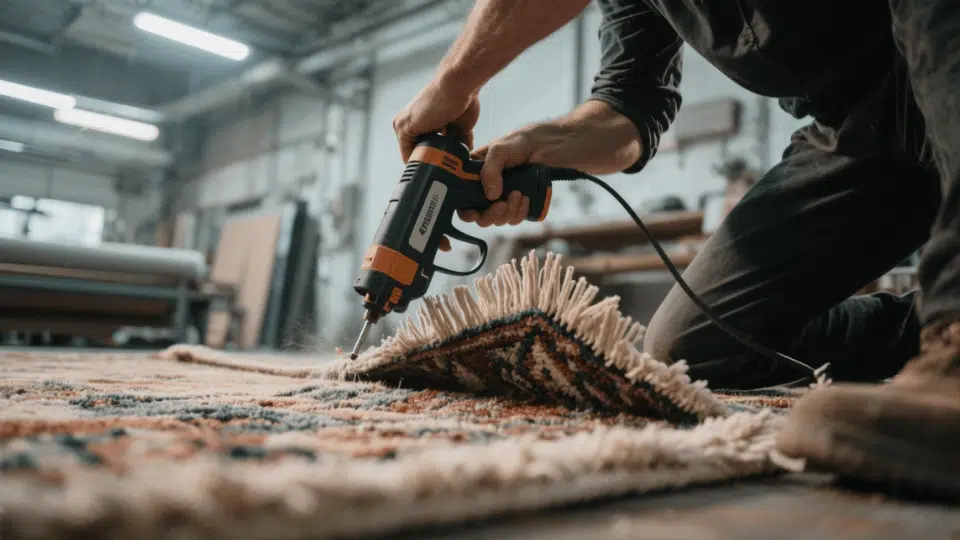
Step 2: Prepare Your Rug Gun
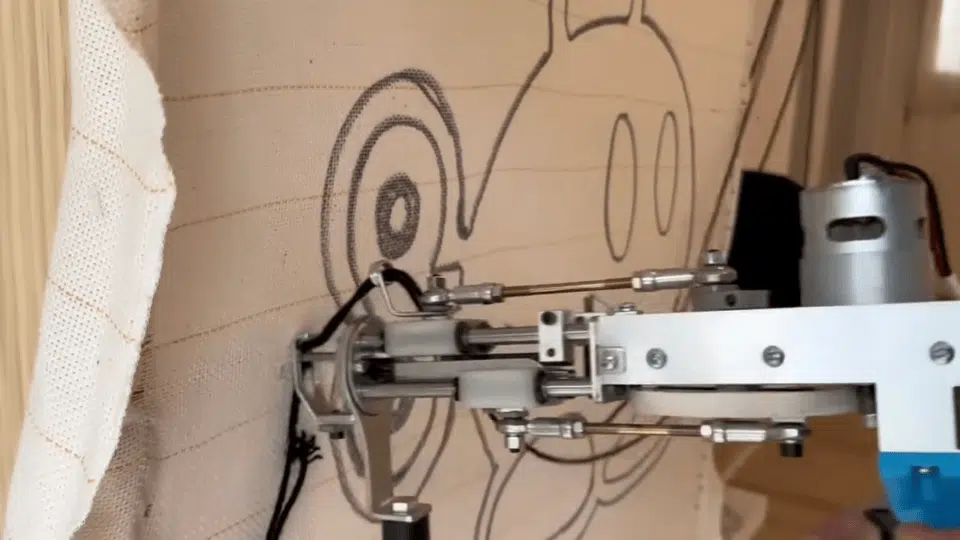
The tufting gun is the most important tool for any DIY rug project. Thread your yarn through the loops at the top of the gun, using a loop threader to guide it through the needle.
Make sure the yarn moves smoothly without tangles. Before plugging it in or switching it on, double-check that the gun is turned off for safety.
Step 3: Start Tufting with Steady Pressure
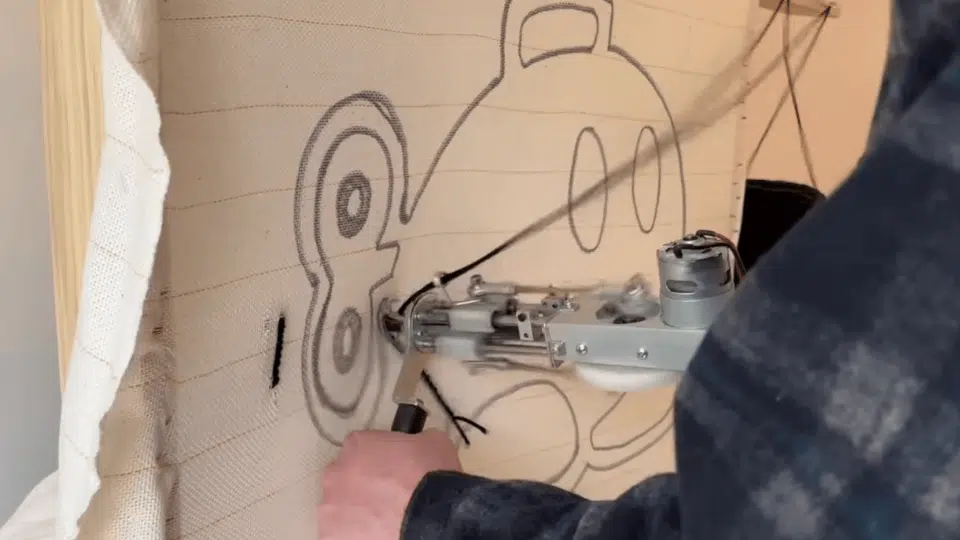
Now the fun part of how to make a rug begins! Turn on the gun and hold it firmly against the fabric. Apply even downward pressure so the yarn properly pierces the backing cloth.
Always move in an upward motion to avoid creating gaps or holes. Keep your pace steady for neat, clean lines that define your design beautifully.
Step 4: Outline and Fill Your Design
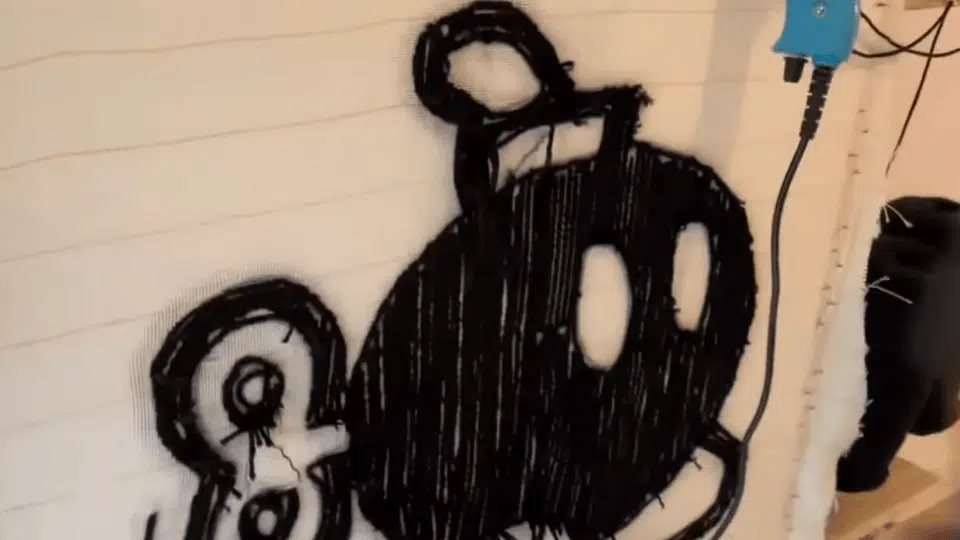
Begin tufting by outlining your traced image first. Once the edges are in place, fill in the larger areas of your rug.
Many crafters find this order easier when making their own rugs, but you can also work on small details first it’s all personal preference. Take your time, especially if it’s your first DIY rug project, and enjoy the creative process.
Step 5: Trim and Shape the Rug Surface
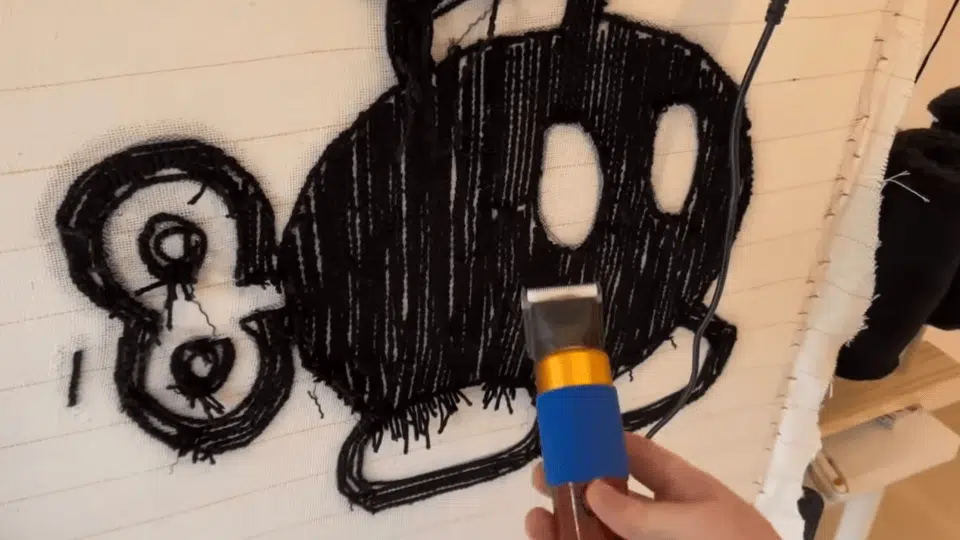
After tufting, trim excess yarn to smooth the rug’s surface. Shearing tools or trimmers work best for creating crisp, defined lines.
Use a dog comb blade to brush the yarn for a polished, fluffy finish. This step brings your DIY rug design to life, making it look professionally crafted.
Step 6: Secure the Backing with Glue
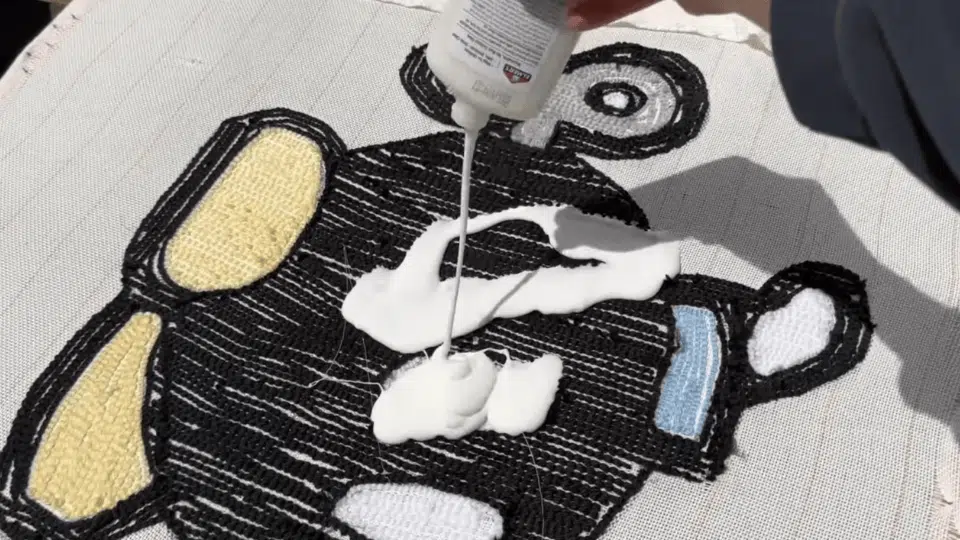
Flip your rug over to apply Elmer’s glue generously on the back. Use a putty knife to spread the glue evenly across the surface. Let it dry completely in the sun before handling.
This step is essential when making your own rug, as it locks the yarn securely in place, keeping your rug strong and durable for long-term use.
Step 7: Cut and Finish the Edges
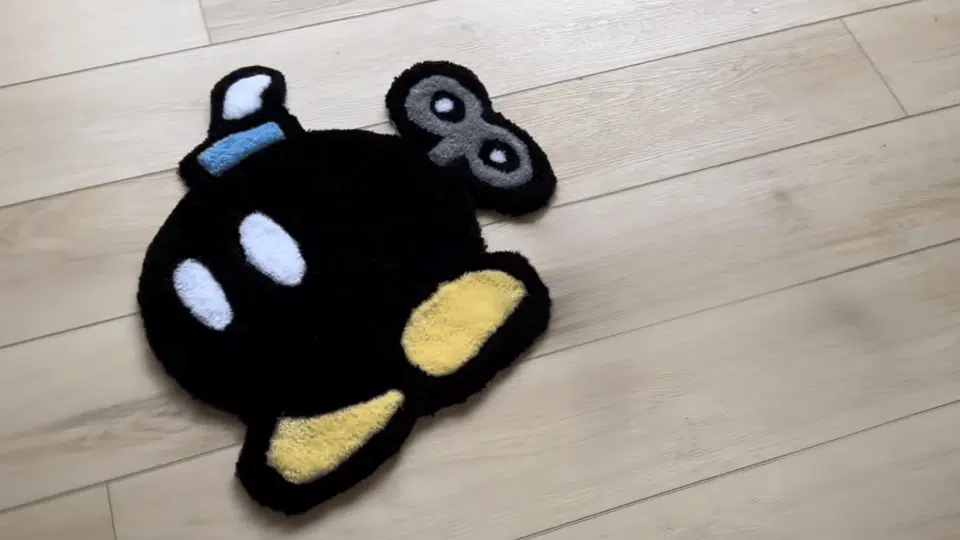
Once the glue is dry, trim along the edges using scissors or a blade.
You can either leave the edges natural, fold them over and glue them for a neater finish, or attach a fabric backing using spray adhesive for a more professional look.
Brush the surface once more to fluff up the yarn and your handmade DIY rug is complete!
For More Detailed Tutorial Check the Video Attached Below
Troubleshooting Common Issues
Even experienced crafters encounter challenges during DIY rug projects. The good news is that most common problems have simple solutions.
Recognizing these issues early and knowing how to fix them saves time, materials, and frustration, ensuring your handmade rug turns out beautifully.
- Uneven Pile or Texture: This happens when loops or tufts vary in height or density. To fix it, maintain consistent pressure and speed while working, trim uneven areas carefully with sharp scissors, and practice your technique on scrap fabric before starting the main project.
- Yarn Pulling Out: Secure loose ends by applying fabric glue to the back of the rug, ensure you’re pulling yarn tight enough during the hooking or tufting process, and double-check that your backing fabric is appropriate for your chosen technique tighter weaves hold better.
- Backing Not Adhering Properly: Clean the backing surface thoroughly before applying adhesive, use high-quality rug backing or fabric glue designed specifically for textiles, apply even pressure across the entire surface, and allow adequate drying time rushing this step leads to peeling or shifting.
Final Thoughts
Making your own rug is more than just a craft project it’s a chance to express creativity while adding functional art to your home.
The skills you develop through rug-making can be applied to countless other DIY projects, making it a worthwhile investment of your time.
Remember that every expert crafter started as a beginner, so embrace the learning process and enjoy watching your ideas come to life.