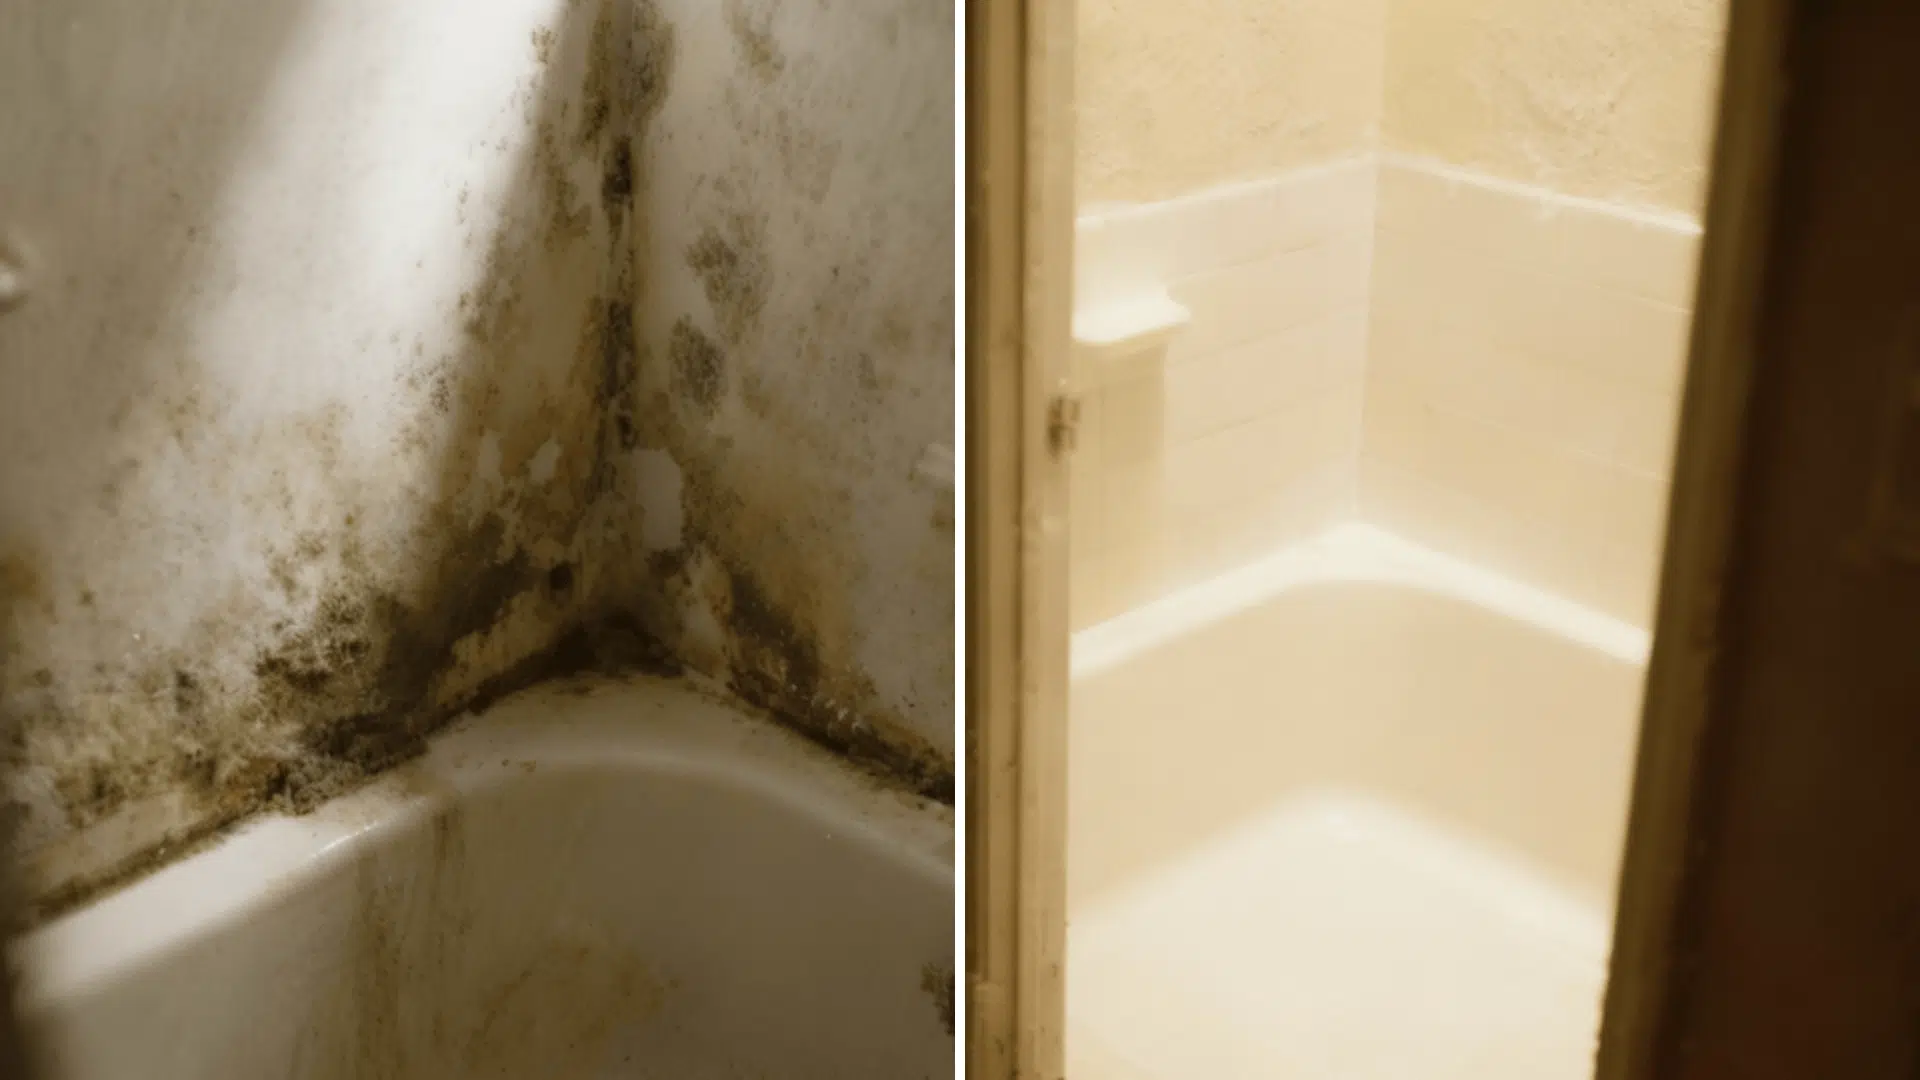
Those tiny white specks crawling along your grout lines or clustering under the sink? You’re probably dealing with mold mites in your bathroom.
These microscopic pests grow wherever mold grows, and bathrooms offer the perfect damp environment they love. Once you tackle the mold, the mites lose their food source and disappear.
In this blog, I will discusshow to get rid of mold mites using supplies you likely already have, along with natural methods that work without harsh chemicals.
You will get through identification, removal steps professionals use, and a simple prevention plan to keep them from coming back.
Are Mold Mites Dangerous for Humans?
Mold mites won’t bite or sting, but they’re not entirely harmless either. The real threat comes from what they feed on, mold itself, and how your body reacts to both.
Here’s what you need to know about the health risks
- Direct Contact Risks: Mold mites typically don’t bite humans. The main concern is allergic reactions or skin irritation in sensitive individuals who come into close contact with infested areas
- Indirect Mold Exposure: The bigger problem is the mold they’re feeding on, which naturally releases spores that trigger respiratory symptoms, asthma flares, and allergic reactions in many people
- When to Seek Help: If you notice persistent breathing issues, worsening allergies, or if anyone in your household is immunocompromised, consult a doctor; mold exposure can become a serious health concern
Once you eliminate the mold, the mites lose their food source, and the health risks drop significantly. Addressing the root moisture problem protects both your bathroom and your family’s well-being.
How to Identify Mold Mites?

Mold mites (Tyrophagus putrescentiae) are tiny arachnids that feed on mold in damp, poorly ventilated bathroom areas. They usually hide in grout lines, caulk edges, and under sinks where moisture lingers.
Here’s how to confirm you’re dealing with mold mites and not something else.
Favorable Conditions for their growth:
- Warm, humid spaces with poor ventilation
- Persistent moisture around tiles, caulk, and vanities
- Active mold growth serves as their main food source
Key Signs to Look For:
- Tiny white or tan specks moving slowly on moldy surfaces
- A shimmering or glittering effect under bright light
- Clusters of mites near damp or moldy areas
To confirm, shine a flashlight at an angle, use clear tape to lift samples onto a white card, or take a macro photo for a closer look.
Materials You Will Need for Mold Mite Removal
Before tackling mold mites, gather the right materials to ensure a thorough and safe cleanup. Here’s a table to refer.
| Essentials | Purpose |
|---|---|
| Vinegar / Bleach | Kills mold and mold mites effectively |
| Spray Bottle | Even application of the cleaning solution |
| Scrub Brush | Removes visible mold patches |
| Gloves & Mask | Protects from allergens and irritation |
| Cloth / Sponge | Wipes and dries cleaned surfaces |
Safety Tip: If you have allergies or respiratory issues, don’t risk your health; let certified mold remediation professionals handle severe infestations.
Step-by-Step Instructions to Get Rid of Mold Mites
Getting rid of mold mites starts with eliminating their food source: The mold. Follow these simple but effective steps.
Step 1: Find and Fix the Moisture Source

Start by locating the damp area or leak that led to mold growth. Repair that source first so the mold loses its foothold. Without moisture, the mites’ food source disappears.
Check common spots like under sinks, around shower edges, and near window sills where moisture often collects. Once the leak or dampness is fixed, clean and dry the area thoroughly to prevent mold from spreading.
Step 2: Prepare a Mold-Killing Cleaning Solution

For a small patch, combine 1 gallon of water with 4 cups of vinegar in a spray bottle or sprayer. As a stronger option, mix 2 cups of bleach with 1 gallon of water (use one solution at a time).
These mixtures target the mold that sustains the mites. Proper application helps break the mold mite cycle in the bathroom. Always ensure good ventilation while cleaning to avoid inhaling strong fumes from either solution.
Step 3: Spray, Dwell, and Scrub Thoroughly

Spray the affected surface until it’s well covered. Let the solution sit for 15–20 minutes to work. Scrub the area with a sponge or brush to remove the mold and the mites feeding on it.
Wipe away loosened residue as you go. Focus on corners, grout lines, and caulk edges where mold tends to hide and spread.
Rinse the cleaned surface with fresh water afterward to remove any leftover cleaner or debris.
Step 4: Wipe Clean and Let the Area Dry

After scrubbing, use a cloth or sponge to wipe the surface clean. Dry the area completely so moisture doesn’t return. Dryness helps prevent the regrowth of mold that draws mites.
Keeping surfaces dry is key to stopping mold mites in the bathroom from coming back. Use a fan or dehumidifier to speed up drying and maintain low humidity levels that discourage future mold growth.
Repeat the same procedure two to three times if traces remain. Do not DIY if the moldy area is larger than 3 square feet or if you have allergies or respiratory issues.
For a more real-time walkthrough, refer to this video tutorial:
Long-Term Solutions for Mold Mite Prevention

Getting rid of mold mites in the bathroom is only half the battle; keeping them from coming back requires consistent habits and smart environmental controls. Here’s what to do:
1. Control Humidity Levels
Keeping humidity under control is the first step to stopping mold mites in the bathroom.
Maintain relative humidity between 35–50% using a dehumidifier or a strong exhaust fan. Low humidity prevents mold from forming, which means mites lose their food source.
Regularly monitor moisture levels, especially after showers, to keep the environment dry and uninviting for mites.
2. Improve Ventilation
Good airflow is essential for preventing both mold and mites. Run your exhaust fan during and at least 20 minutes after showers, or crack a window or door to improve circulation.
Consistent ventilation removes excess steam and prevents damp air from settling on surfaces, reducing the risk of mold returning.
3. Adopt Dry-Out Habits
After each use, squeegee glass doors and tiled walls to remove leftover water. Hang towels properly and avoid leaving wet items on shelves or in corners where moisture collects.
These simple daily habits stop humidity buildup, making your bathroom less appealing to mold and mold mites in the bathroom.
4. Choose Mold-Resistant Materials
When remodeling or repairing, select mold-resistant caulk, grout, and paint for wet areas. These materials slow down moisture absorption, reducing the likelihood of mold growth.
By minimizing mold formation, you naturally prevent mites from multiplying in hidden spots and corners. This small upgrade helps create a long-lasting barrier that keeps bathroom surfaces cleaner.
5. Inspect Regularly
Set a routine to check under sinks, around faucets, and near plumbing for leaks or moisture buildup. Early detection allows for quick fixes before mold or mites become visible.
Consistent inspection helps prevent long-term issues and keeps your bathroom mite-free.
It also allows you to catch small leaks or damp spots early, stopping mold and mite growth before they become serious problems.
6. Use Natural Deterrents
A weekly spray of a diluted vinegar or tea tree oil solution helps naturally discourage mold growth. These gentle solutions keep surfaces clean without harsh chemicals.
Regular use not only keeps your bathroom smelling fresh but also breaks the cycle that attracts mold mites in the bathroom.
Community Tips on Dealing with Mold Mites

Here’s a collection of real-world advice from community forums and Q&A discussions like Quora and Facebook , simple, practical steps to help control moisture, manage mold safely, and prevent mites from coming back.
1. How do I get rid of mold mites when I can’t find the source?
Eliminate the hidden food and moisture: hunt for damp areas behind walls/baseboards, under sinks, in HVAC systems, and in stored papers; dry, ventilate, and dehumidify until mold can’t regrow.
2. Is there a quick product hack people actually use?
Some users saturate with alcohol (e.g., vodka), then apply chlorine bleach for stains, and finish with detergent, noting that this may discolor items and that professional removal is often safer.
3. What’s a stopgap while I fix leaks and humidity?
Lightly dust diatomaceous earth on floors/paths to reduce soft-bodied mites as a temporary measure while you remediate moisture and mold.
4. Why do mites keep coming back after I clean?
Bleach wiping alone can add humidity; without drying the space (ventilation, dry heat, dehumidifier) and removing moisture sources, mites and mold rebound.
5. When should I call professionals?
If the area is large, symptoms persist, or the source is hidden, community voices recommend hiring a certified mold mitigation/pest control professional to locate and remediate safely.
When to Call a Professional for Mold Mites?
Sometimes DIY methods aren’t enough to handle mold mites, especially when the infestation keeps coming back or the mold is widespread. Call a certified professional if you notice any of the following:
- The mold covers more than 3 square feet or keeps returning after cleaning
- There’s a musty odor that persists even after scrubbing and drying
- Hidden leaks or moisture sources can’t be identified or fixed easily
- You experience allergy, asthma, or breathing issues when cleaning
- Mold is growing behind walls, tiles, or inside ventilation ducts
- Standard cleaning products don’t remove the infestation completely
- You want a complete inspection to prevent future mold and mite growth
The Final Takeaway
As far as I can tell from my experience, dealing with mold mites in the bathroom gets easier once you understand it’s really about staying ahead of moisture.
Once the mold is cleaned and leaks are repaired, the next step is keeping the space dry and well-ventilated.
Make it a habit to run the exhaust fan after showers, wipe down wet surfaces, and leave the door slightly open to let fresh air circulate.
These small steps take only a few minutes but go a long way in preventing mites and mold from returning. With steady upkeep, the bathroom stays clean, fresh, and free from that damp, musty feeling.