Standing before a bumpy wall, I’ve wondered countless times whether covering it with wallpaper would end in triumph or disaster. The truth lurks somewhere between surface preparation and material choice.
Through my years of experience, I’ve learned that textured surfaces demand careful consideration. Those irregularities won’t magically disappear, and thin papers expose every imperfection mercilessly.
The difference between flawless results and visible bumps comes down to making smart decisions and avoiding shortcuts.
Can You Wallpaper Textured Walls?
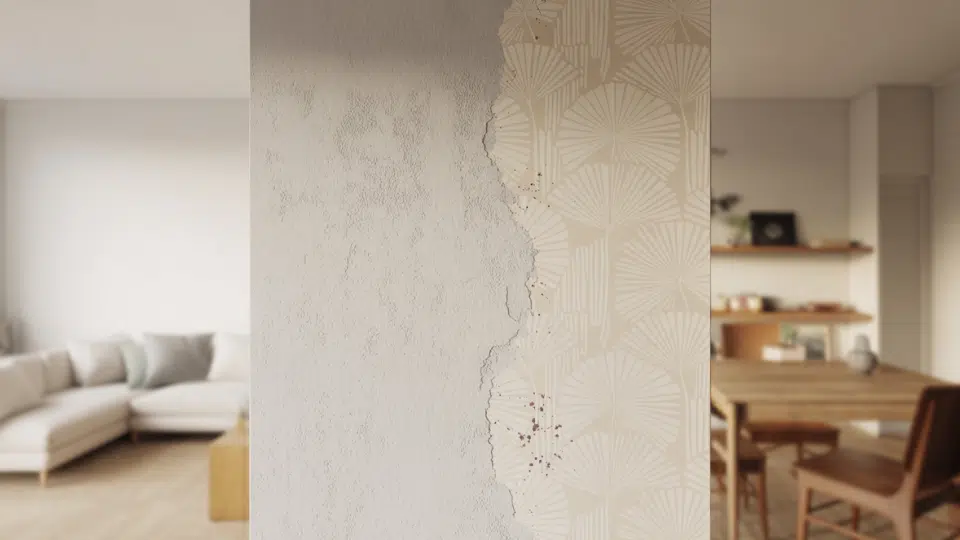
Can you put wallpaper on textured walls? Yes, but there’s a catch. While wallpaper will technically adhere to textured surfaces, the results might not match your perfect vision.
Think of it like putting a fitted sheet on a lumpy mattress; it’ll stay on, but those bumps will show through. Your success hinges on three key factors.
First, how pronounced is your wall texture? Light orange peel texture behaves differently from heavy knockdown. Second, your wallpaper choice matters; thicker, textured papers hide imperfections better than delicate, smooth varieties.
Finally, there’s the prep work question: are you ready to sand, skim coat, or prime? The more effort you invest upfront, the better your finished result will look.
Not All Textures Are Wallpaper-Friendly
Different wall textures affect the appearance and feel of wallpaper. Subtle textures like orange peel or light knockdown are ideal, as quality wallpaper can handle small valleys without issues.
Skip trowel finishes? Also manageable with proper preparation. Now, heavy knockdown and brush textures enter trickier territory. You’ll see shadows and bumps, especially with thinner papers.
As for popcorn ceilings extended to walls or heavy stucco? Just don’t. These aggressive textures create too many peaks and valleys, preventing wallpaper from properly adhering.
Here’s the reality: even “workable” textures will telegraph through thin wallpaper. It’s physics, not failure. Thicker, textured wallpapers naturally camouflage these imperfections better than smooth, delicate designs.
Essential Preparations Before Wallpapering
Many homeowners wonder if you can wallpaper textured walls, and while it’s achievable, understanding the key issues beforehand helps ensure success.
Step 1: TestFirst

This step is non-negotiable; before committing to entire rolls, order samples and run a real-world test. Stick a piece to your actual textured wall and wait 3-5 days, not just a few hours.
Check how well it adheres and how visible the texture remains underneath. This small investment saves you from expensive mistakes. If the test looks terrible, you’ve learned something valuable before wasting money on full rolls.
Step 2: Clean Thoroughly

Even invisible dirt hampers adhesion. Wash walls with mild detergent and water, especially in kitchens where grease builds up. Rinse thoroughly and dry for at least 24 hours.
This isn’t optional prep work; it’s the foundation of everything else. Wallpaper paste bonds to clean surfaces, not to the film of dust you can’t see, but that definitely exists.
Step 3: Address Rough Spots

Walk your walls with a critical eye, feeling for sharp peaks or loose texture bits. Gently scrape off any protruding material, then smooth sharp points with 220-grit sandpaper.
You’re not removing all texture here, just the troublemakers that’ll create air bubbles or tears. Wipe down the dust afterward.
Think of this as removing obstacles from wallpaper’s path, giving it the smoothest shift possible across your textured landscape.
Step 4: Smoothen the Surface

This is your fork-in-the-road moment. Light texture might only need focused sanding on rough patches. But moderate to heavy textures benefit enormously from skim coating, applying a thin layer of joint compound over everything.
Yes, it adds 2-3 days for drying and sanding, but it creates a professional-looking surface. Your choice depends on the severity of your texture and your perfectionism. This step is optional but recommended.
Step 5: Prime the Walls

Quality wallpaper primer is your insurance policy. It dramatically improves adhesion, seals the surface, and makes future removal infinitely easier.
Yes, think ahead to that day. Don’t use regular paint primer; get one specifically formulated for wallpaper. Apply evenly, let it cure completely per manufacturer instructions, and you’ve created the optimal foundation.
This final step ties all your prep work together, giving your wallpaper the best possible chance at success.
Key Issues When Wallpapering Textured Walls
Let’s talk about what actually happens when you wallpaper textured walls. The biggest issue? Physics. Textured surfaces mean less contact area for your wallpaper to grip, creating potential air pockets, especially frustrating with peel-and-stick varieties.
Trapped moisture becomes a real concern in bathrooms, potentially inviting mold to the party. Then there’s the aesthetic reality: those bumps and ridges will show through, particularly with lighter colors or thin wallpaper.
Seams might refuse to lie perfectly flat, no matter how carefully you work. Achieving that crisp, professional finish takes serious effort.
Choosing the Right Wallpaper
When learning how to wallpaper textured walls, your wallpaper choice makes or breaks this project. Thick wallpaper. 10 mil or thicker, acts like a forgiving blanket over imperfections.
Traditional non-woven wallpapers adhere better to textured surfaces than peel-and-stick ones. Pattern choice is crucial: busy designs hide bumps, while solids highlight imperfections.
Darker shades better hide texture shadows than lighter shades. Avoid thin peel-and-stick wallpaper, as its weak adhesive struggles to adhere to uneven surfaces and leaves bumps.
Light colors with simple patterns? They’ll showcase texture you hoped to hide. Designs mimicking smooth materials like faux marble or wood grain? They need perfection; you can’t deliver on textured walls.
Conclusion
So, can you wallpaper textured walls? Absolutely! While textured walls present unique challenges, proper preparation makes wallpapering entirely achievable.
Assess texture depth: light textures need skim coating, heavy textures need lining paper or smoothing.
I recommend starting with a small test area to ensure proper adhesion before tackling entire walls. With patience and the right techniques, textured walls can transform into stunning wallpapered surfaces.
Ready to start your wallpapering project?