There’s something satisfying about crafting your own diy wine rack that fits your space perfectly and shows off your style.
No matter if you’re storing just a few bottles or building a collection, this guide breaks down simple steps and material choices anyone can follow.
I’ll also share common pitfalls to avoid and tips to keep your wine rack looking great for years.
If you’re ready to add a personal touch to your home and keep your wine collection safe, let’s get started on building something truly unique and functional.
Creating the Perfect Environment for Your Wine Collection
Before you start your wine cellar construction project, let’s cover the fundamentals that separate good storage from great storage.
- Temperature control: Wine survives between 45 and 65°F with minimal fluctuations. Avoid placing racks near ovens, dishwashers, or heating vents that create temperature swings
- Light protection: UV rays can damage wine over time, leading to premature aging. Position your diy wine cellar away from direct sunlight and use tinted bottles when possible
- Proper positioning: Store bottles horizontally or at slight angles to keep corks moist and sealed. Upright storage dries corks, allowing air to spoil wine
- Humidity levels: Maintain 50-70% humidity to prevent cork shrinkage without encouraging mold growth. Basements naturally provide better conditions than kitchens
- Vibration concerns: Constant movement disturbs sediment and accelerates aging. Place racks on stable surfaces away from appliances, traffic areas, or speakers
Tools and Materials Required
A good build starts with having the right tools and materials ready. Each item on the list plays a small but important role in making the wine rack sturdy and clean-looking.
| Item | Use |
|---|---|
| 2×2 boards & 3½-inch boards | Frame and shelves |
| Screws (1⅝″ & 4″) | Assembly |
| Jigsaw & drill | Cutting and drilling |
| Sander | Smoothing edges |
| Measuring tape | Accurate layout |
| Wood stain or paint | Finishing |
| Safety gear | Protection while working |
Steps to Build Your Own DIY Wine Rack
Building a wine rack from scratch brings both function and character to a home. It’s a project that combines simple tools with creativity, turning plain wood into something useful and stylish.
With a bit of patience and care, it comes together smoothly.
Step 1: Gather Materials and Plan Your Design
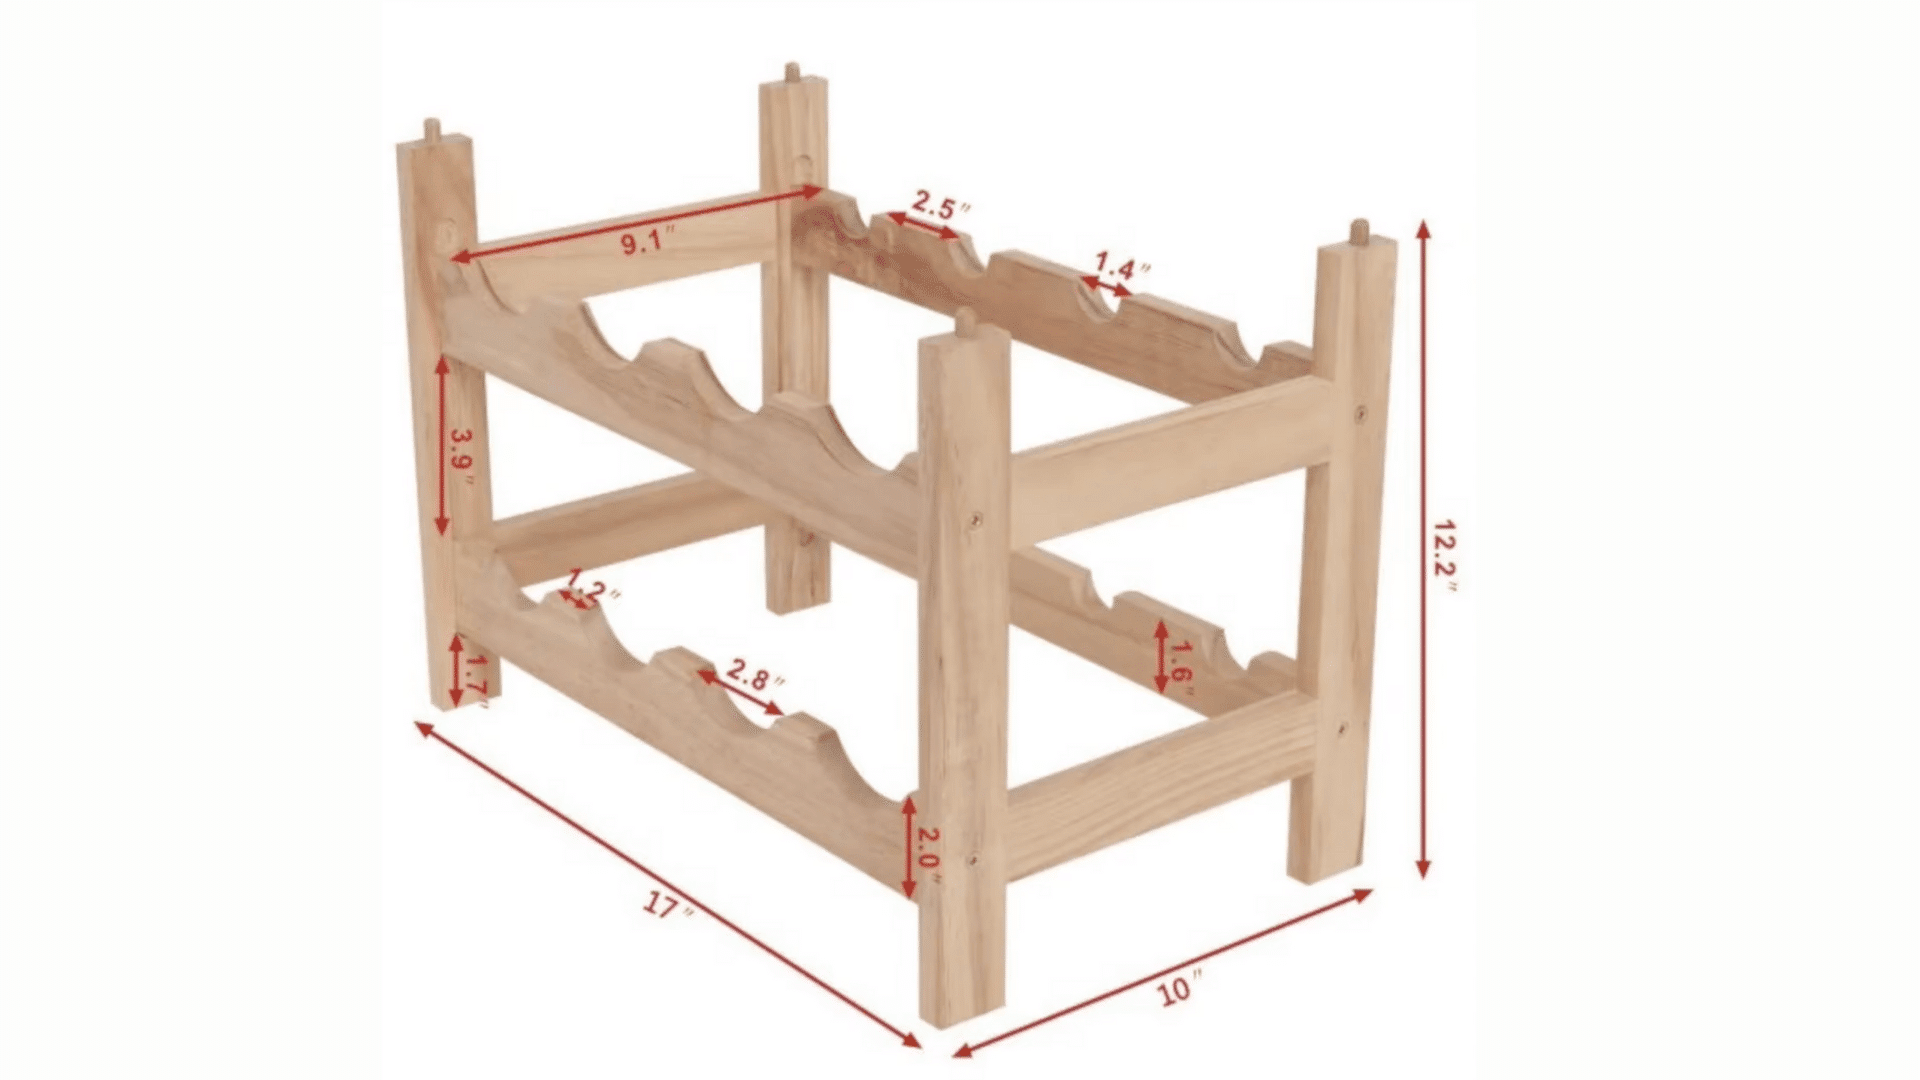
Begin by deciding how wide and tall you want your wine rack to be. A good starting size is around 3 feet wide, which can hold 30 bottles arranged in 5 rows of 6.
Use 2×2 boards for the frame beams and 3½-inch boards for the crosspieces. You can buy these pre-cut to size, so a table saw isn’t needed.
If you’d like a custom fit, measure and cut them using a simple hand or power saw.
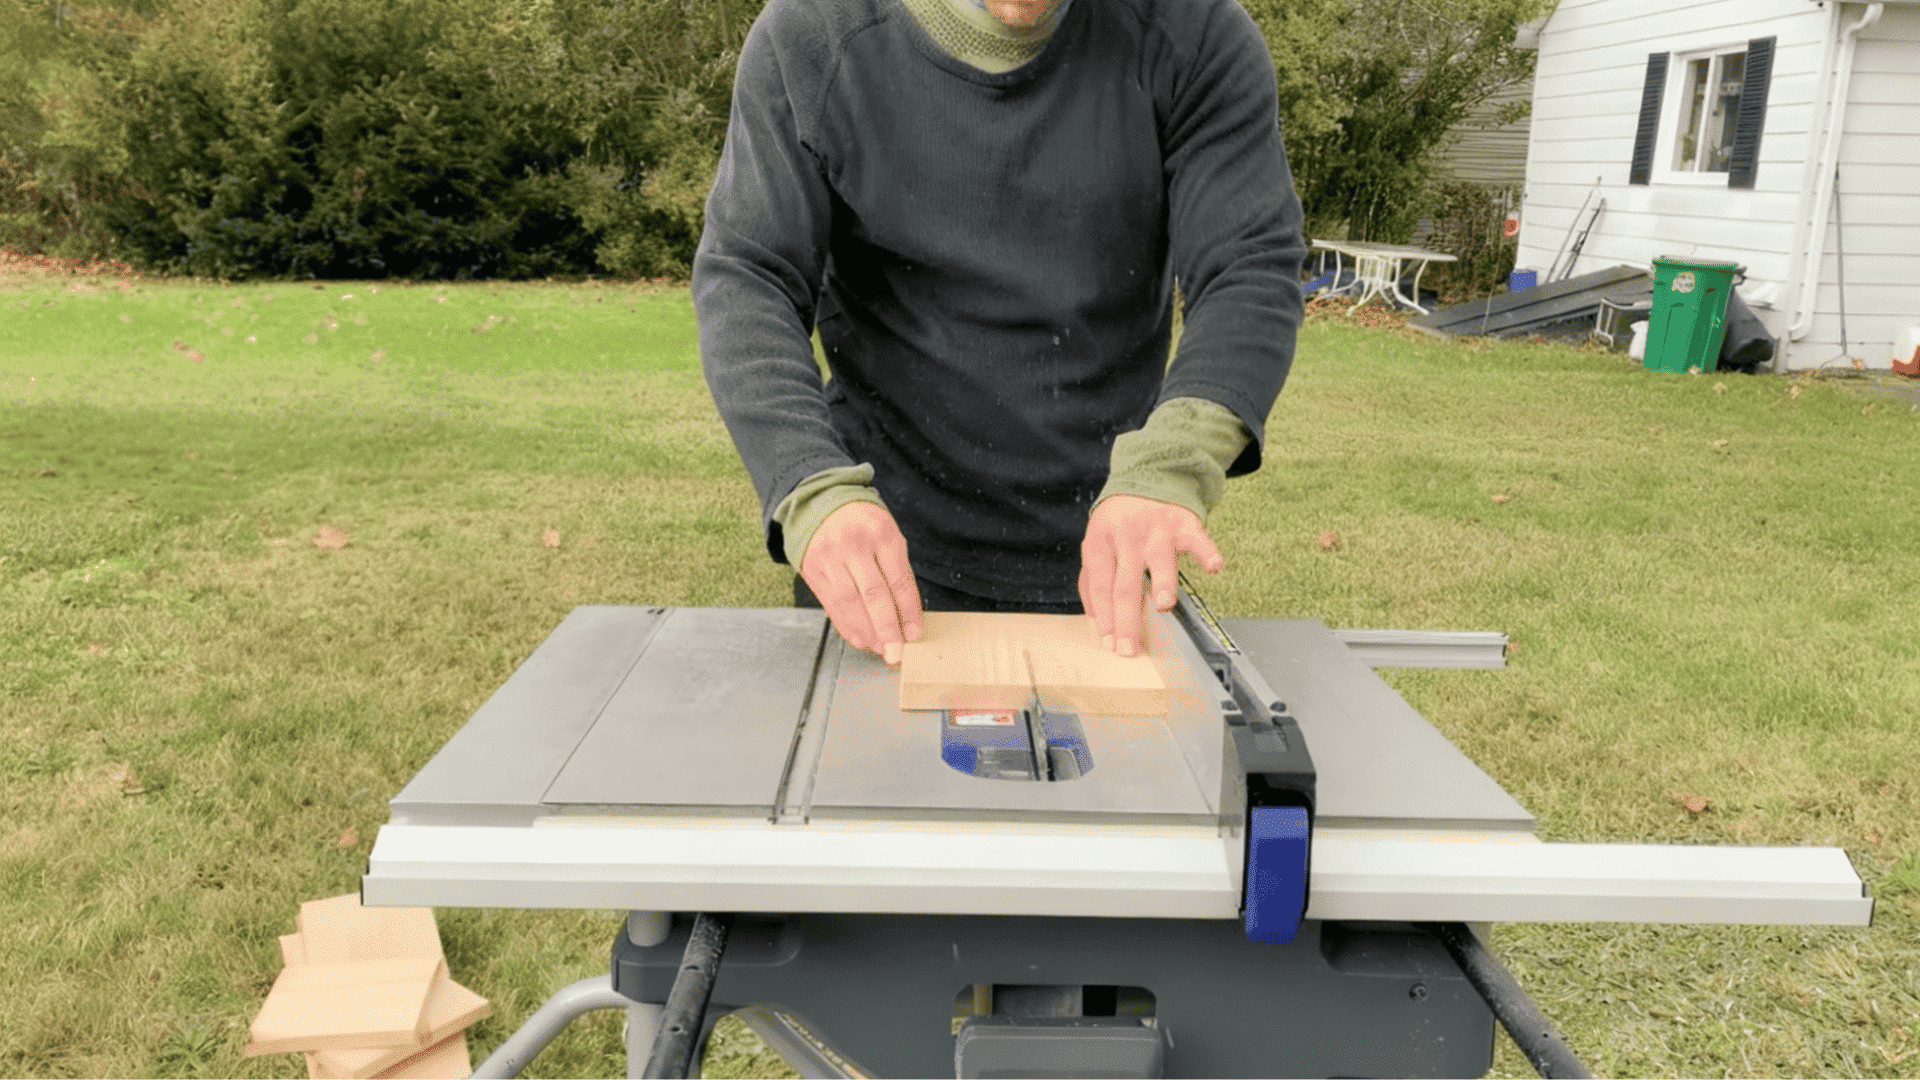
Step 2: Cut and Shape the Boards
Mark where each bottle will sit before you start cutting. For the back supports, draw circles with about a 2-inch radius, starting the first one 5½ inches from the edge and spacing each additional hole 5 inches apart.
For the front supports, draw half-circles with a ⅝-inch radius for the bottle necks.
Cut out the shapes using a jigsaw, then smooth all edges with a sander so the bottles rest securely and the wood feels clean to the touch.
Step 3: Build the Frame
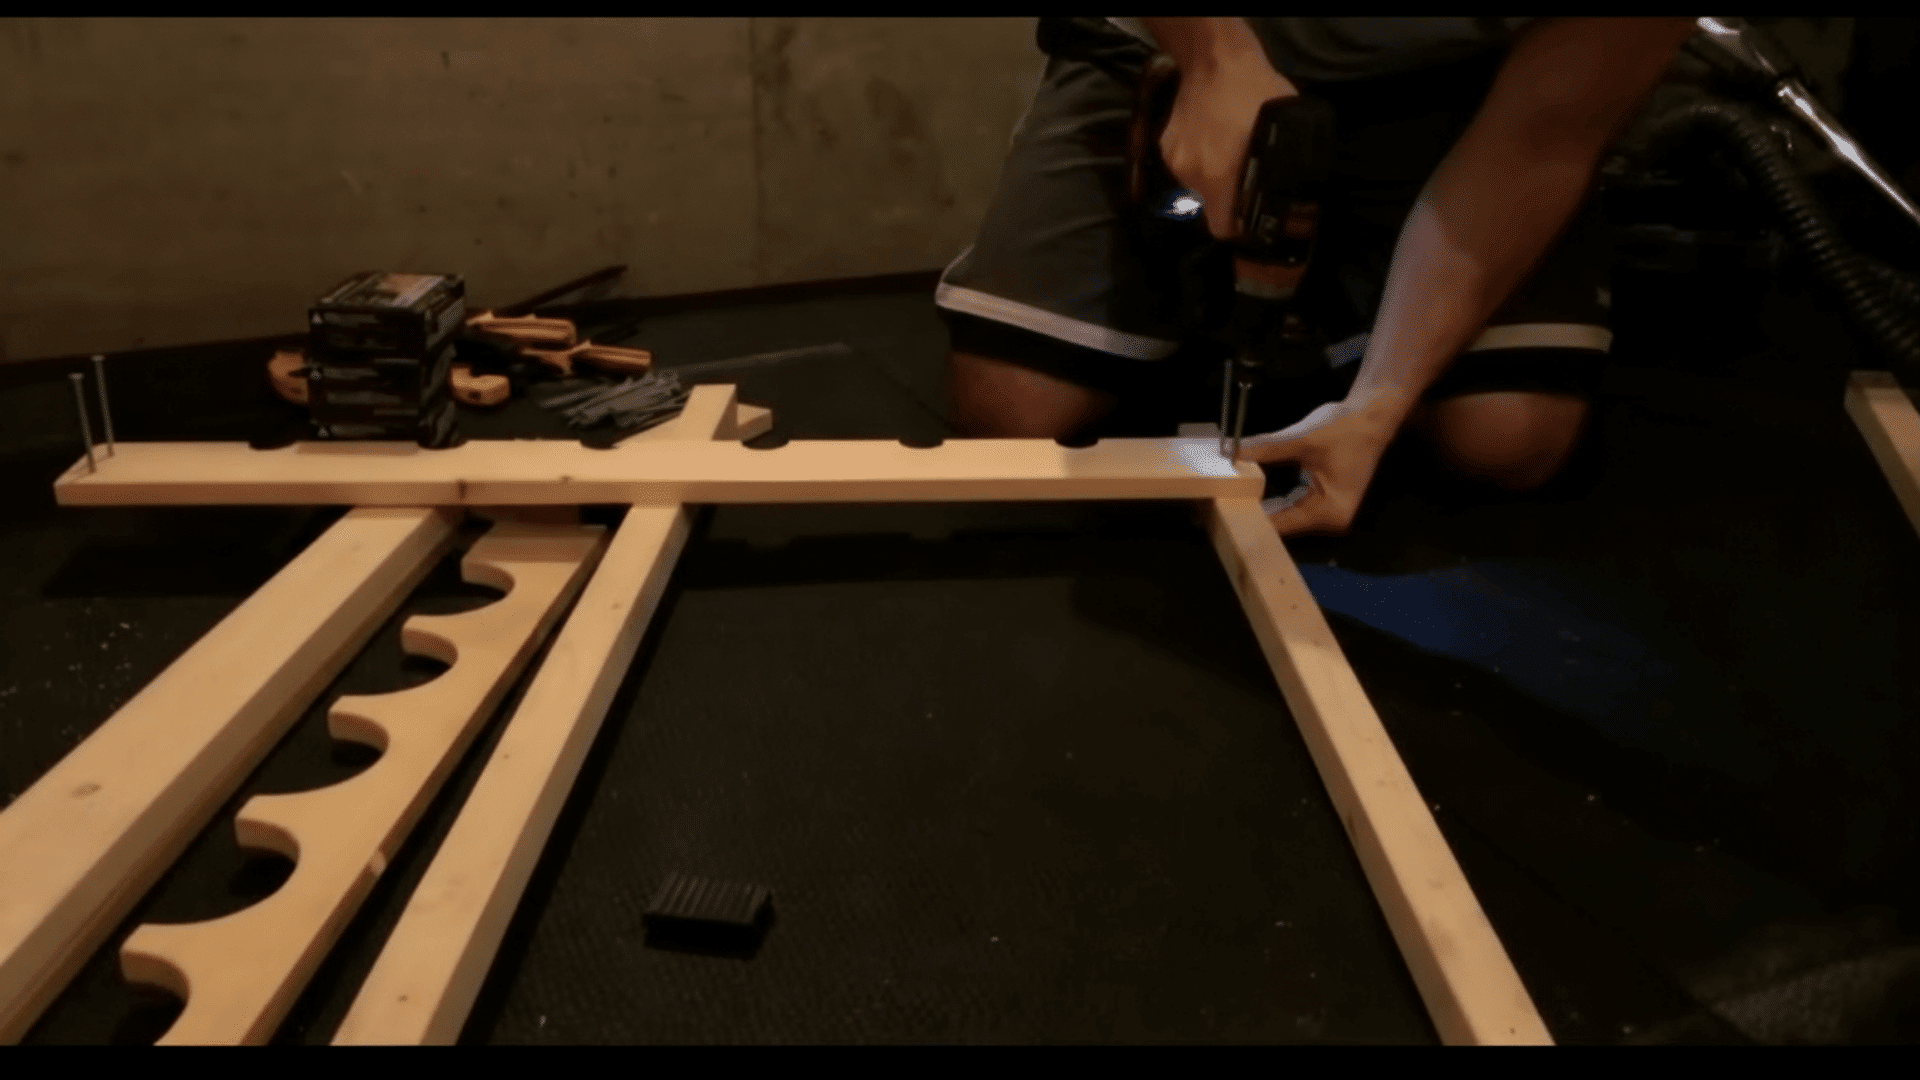
Lay out the four 2×2 beams vertically to form the side supports. Drill pilot holes in the wood before screwing the boards in. This prevents splitting.
Attach the front and back boards to the side beams, keeping about 5 inches of space between each horizontal row. After securing each level, check that the rack is straight and evenly spaced before moving on.
Step 4. Secure and Adjust the Bottle Supports
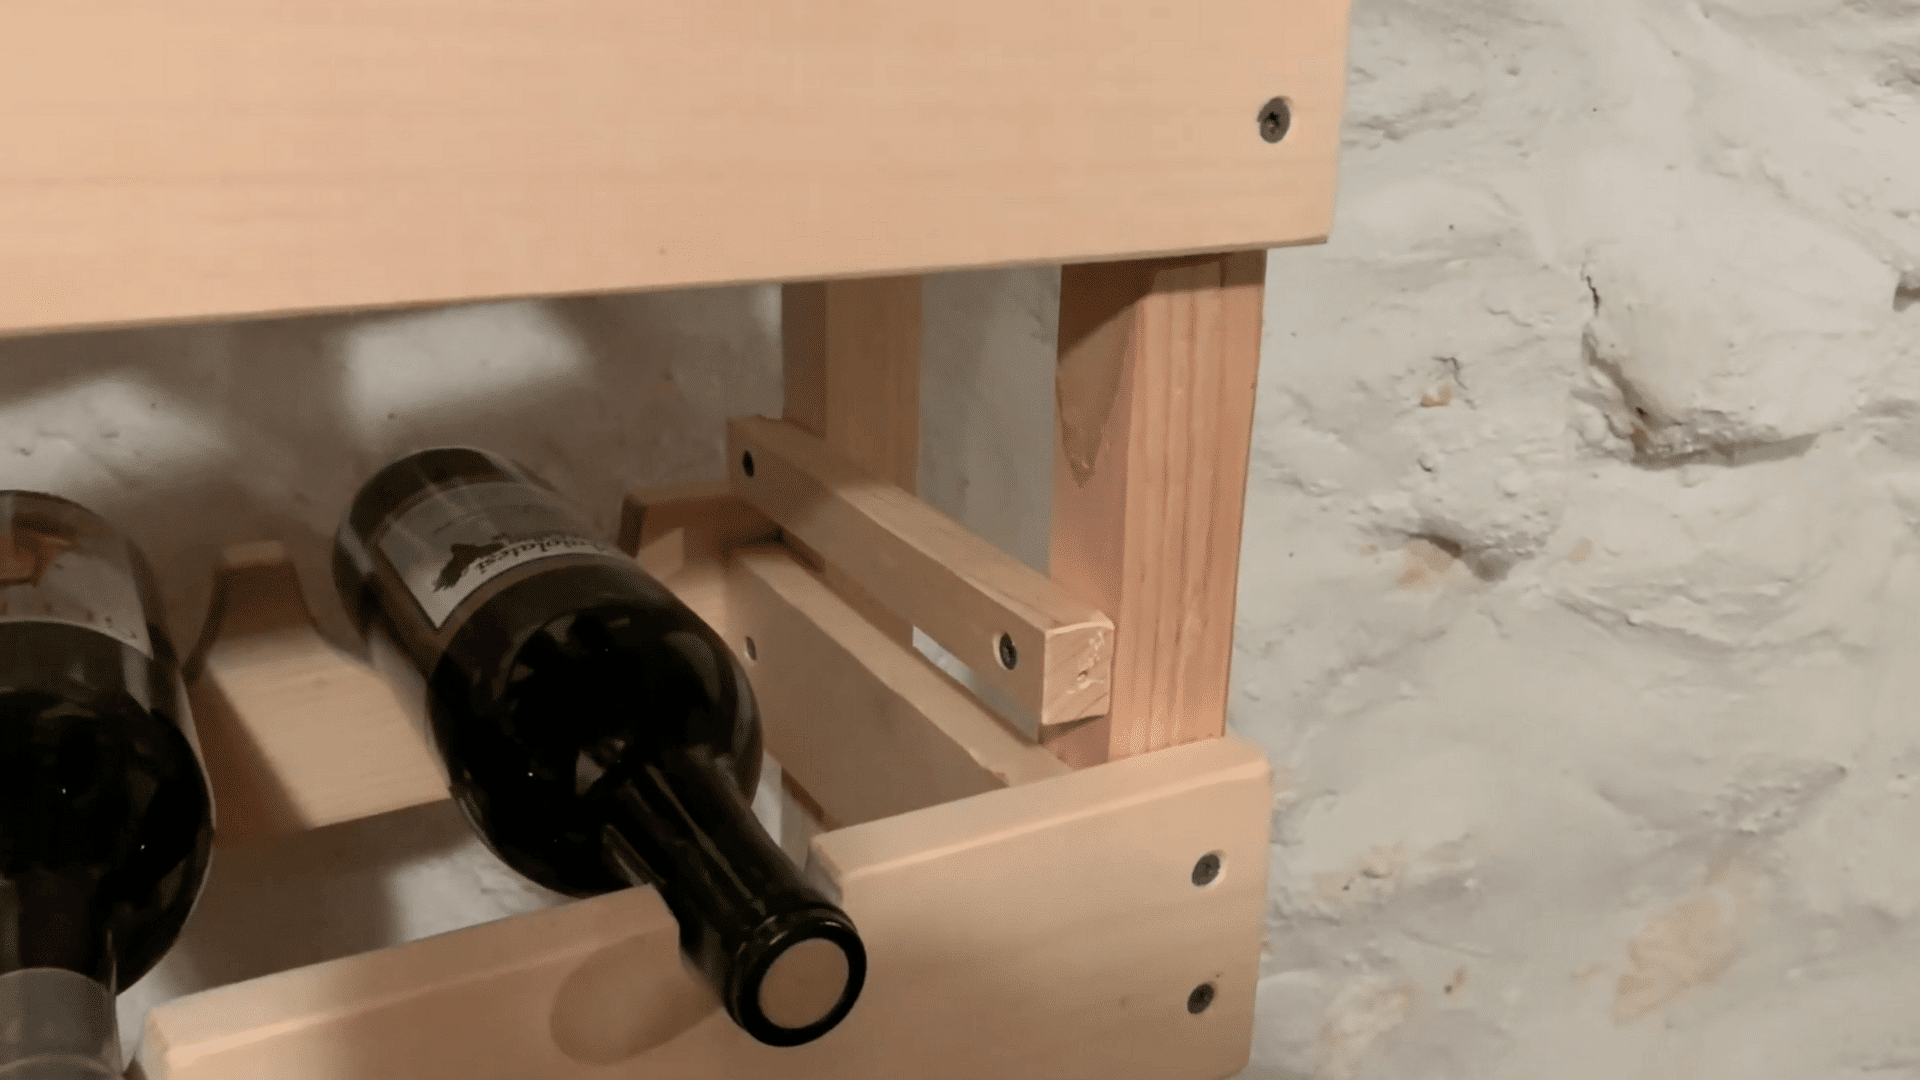
If the bottles don’t sit firmly or feel loose, you can add narrow support strips inside the frame. Drill and screw these smaller boards inside each section to create a snug fit for the bottles.
Use 1⅝-inch screws for this step to keep the supports tight without piercing through the wood. This small fix ensures your bottles stay steady and safe.
Step 5. Sand, Finish, and Display
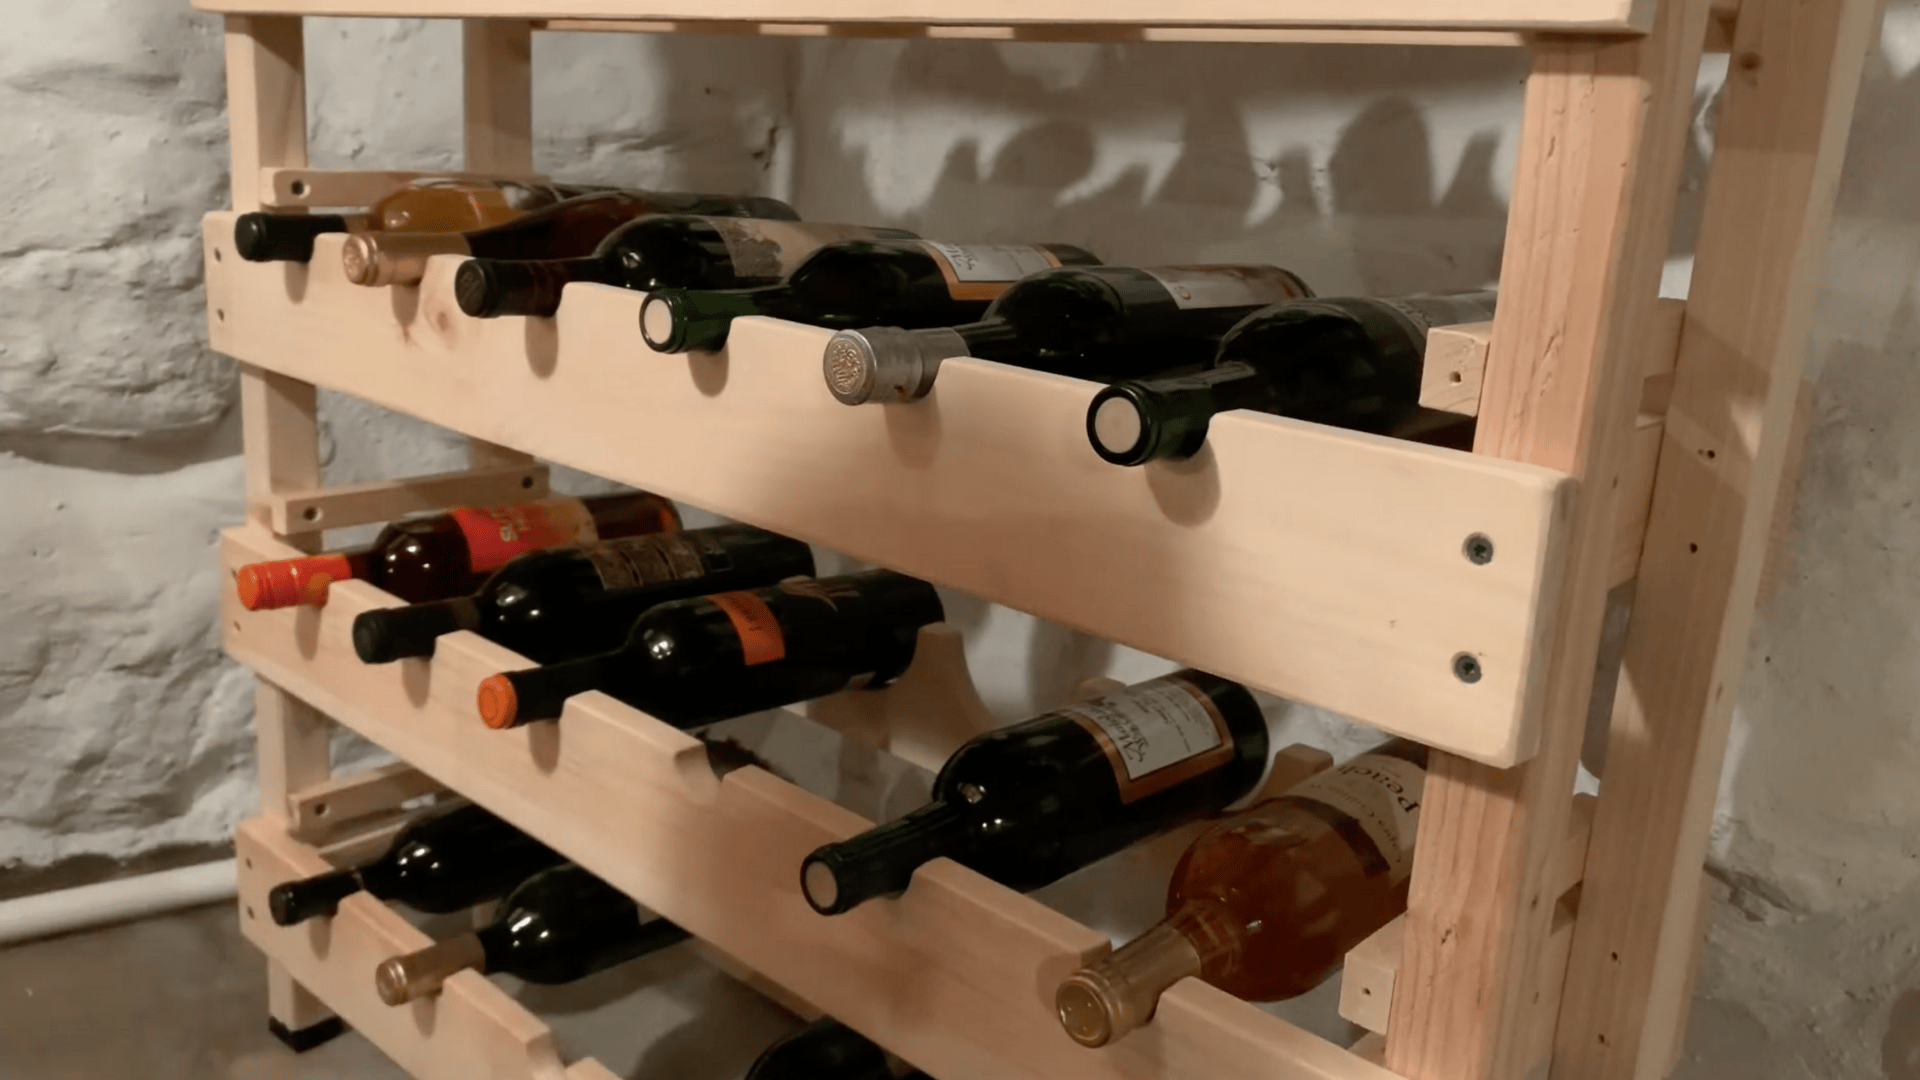
Give the entire rack a final sanding so all surfaces are smooth. If you’d like a polished look, apply wood stain or paint that matches your space.
Once it’s dry, place the rack in your preferred spot, like a basement corner or home bar area, and fill it with your favorite wine bottles.
Step back, admire your work, and enjoy the cozy, rustic touch it adds to the room.
When the last screw is in place and the bottles are neatly lined up, the effort truly pays off. Every piece holds a story from the first cut to the final polish, and it’s satisfying to know that the work made something lasting and personal.
For More Detailed Instructions, Refer to The YouTube Video Below:
Other Simple DIY Wine Rack Ideas to Try
Building your own wine rack doesn’t have to be complicated or expensive. Let’s find some straightforward designs that deliver both function and style without requiring professional-level skills.
1. Rustic Wall Vineyard

A wall-mounted rack maximizes vertical space while keeping your bottles within easy reach. This classic design works perfectly in kitchens, dining rooms, or even small apartments where floor space is limited.
- Tools and Materials: Drill with bits, saw (circular or miter), measuring tape, level, pine or cedar boards, wood screws, wall anchors, wood stain, and mounting brackets
- Steps to Follow: Cut and sand the wood boards, then drill evenly spaced holes for bottle necks, and apply your chosen stain or paint, allowing it to dry completely. Attach mounting brackets and secure to wall studs using anchors
- Styling Tip: Match the wood stain to your existing furniture or paint it in contrasting colors to create a statement piece that draws attention to your wine collection
- Skill Level: Beginner
2. Tabletop Wine Holder
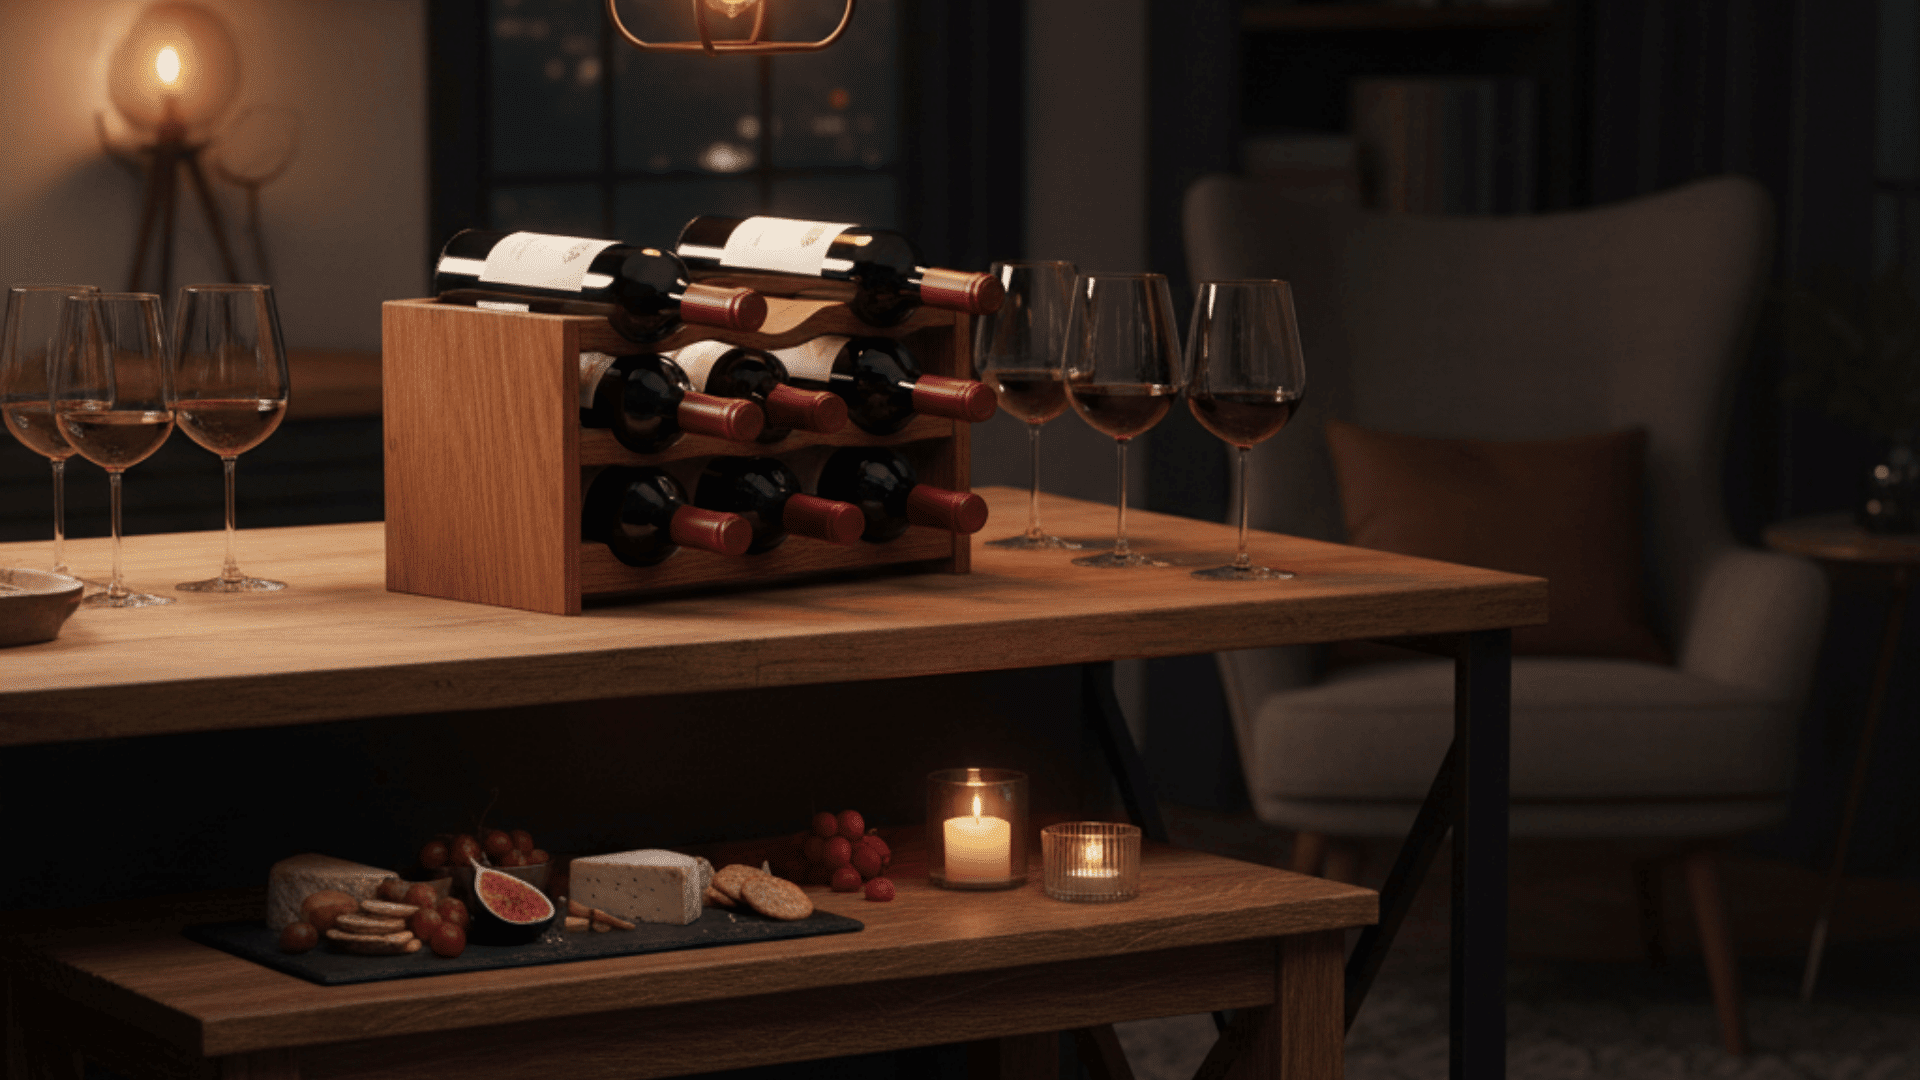
Perfect for countertops or buffet tables, this freestanding design showcases your favorite bottles while keeping them stable and accessible during gatherings.
- Tools and Materials: Hand saw or jigsaw, drill, clamps, hardwood boards (oak or maple), wood glue, finishing nails, sandpaper, and varnish
- Steps to Follow: Cut angled slots into the base pieces, glue the side supports together, clamp the pieces until the adhesive sets, then sand all surfaces thoroughly. After that, apply protective varnish in thin coats, and allow proper curing time
- Styling Tip: Position this holder on a bar cart or kitchen island with decorative wine glasses nearby to create an inviting entertainment station
- Skill Level: Beginner
3. Vintage Ladder Display
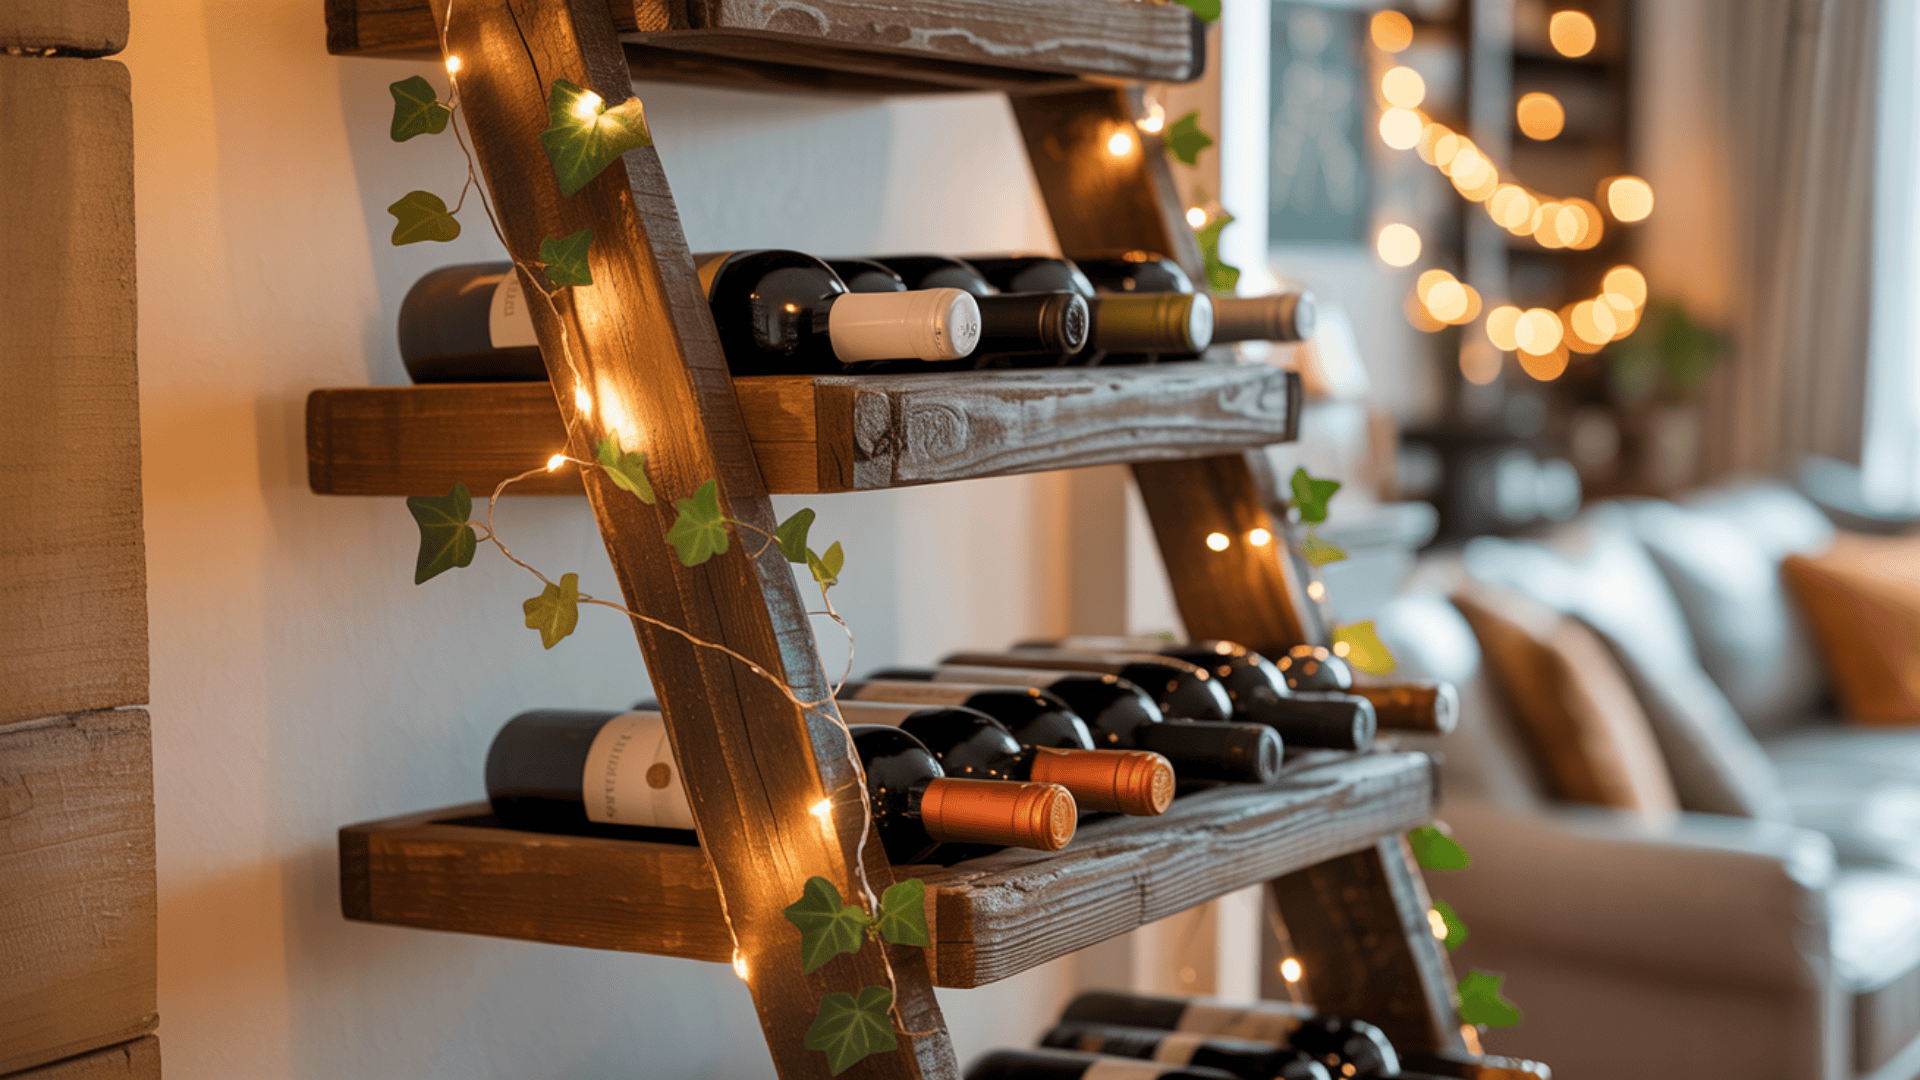
Repurpose a ladder into a rustic wine cellar element that leans stylishly against any wall. This project adds character while providing practical storage for multiple bottles.
- Tools and Materials: Screwdriver or impact driver, measuring tape, safety goggles, vintage wooden ladder, small wooden planks, metal brackets, wood conditioner, and rope (optional)
- Steps to Follow: Clean ladder and attach planks between rungs using metal brackets, then sand rough spots and apply wood conditioner for protection. Position the ladder at a safe leaning angle and test the weight capacity
- Styling Tip: Drape fairy lights or greenery along the ladder sides to enhance the rustic farmhouse aesthetic and make your wine display a focal point
- Skill Level: Intermediate
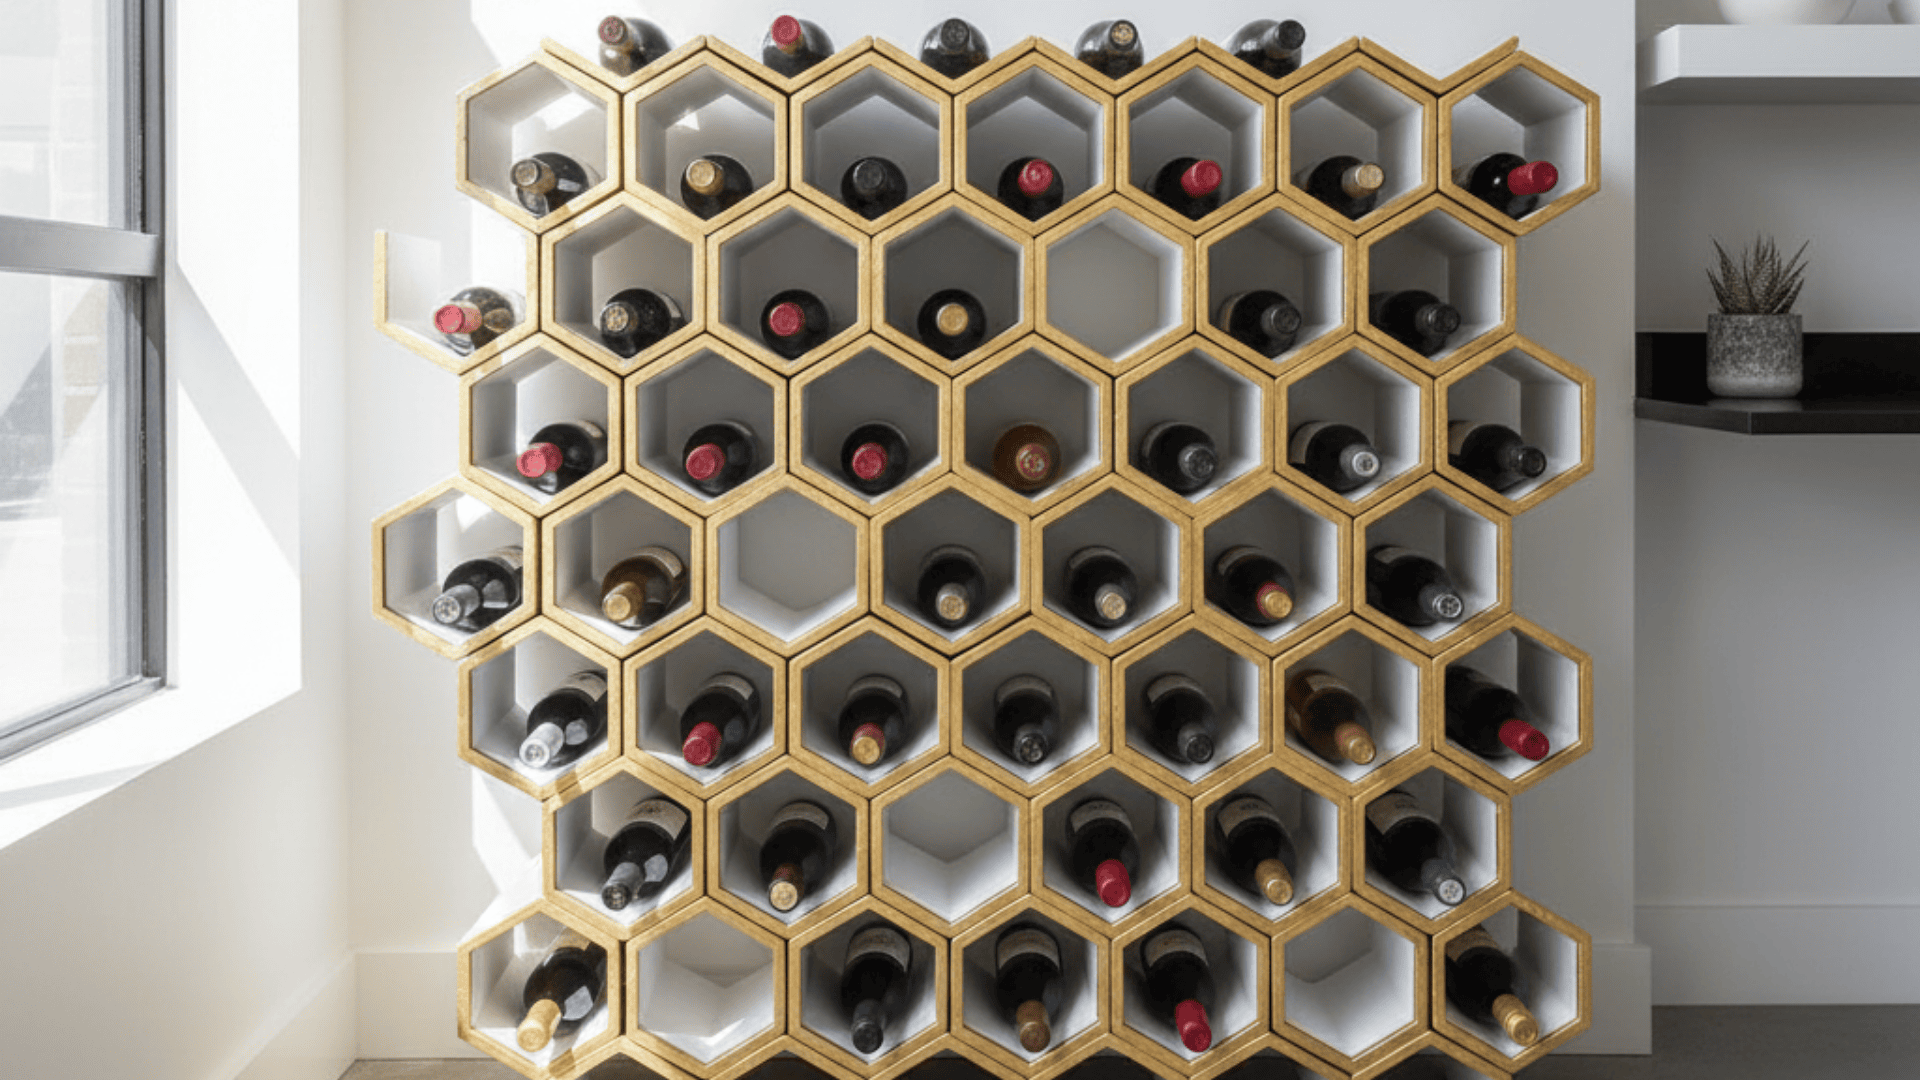
4. PVC Pipe Wine Organizer
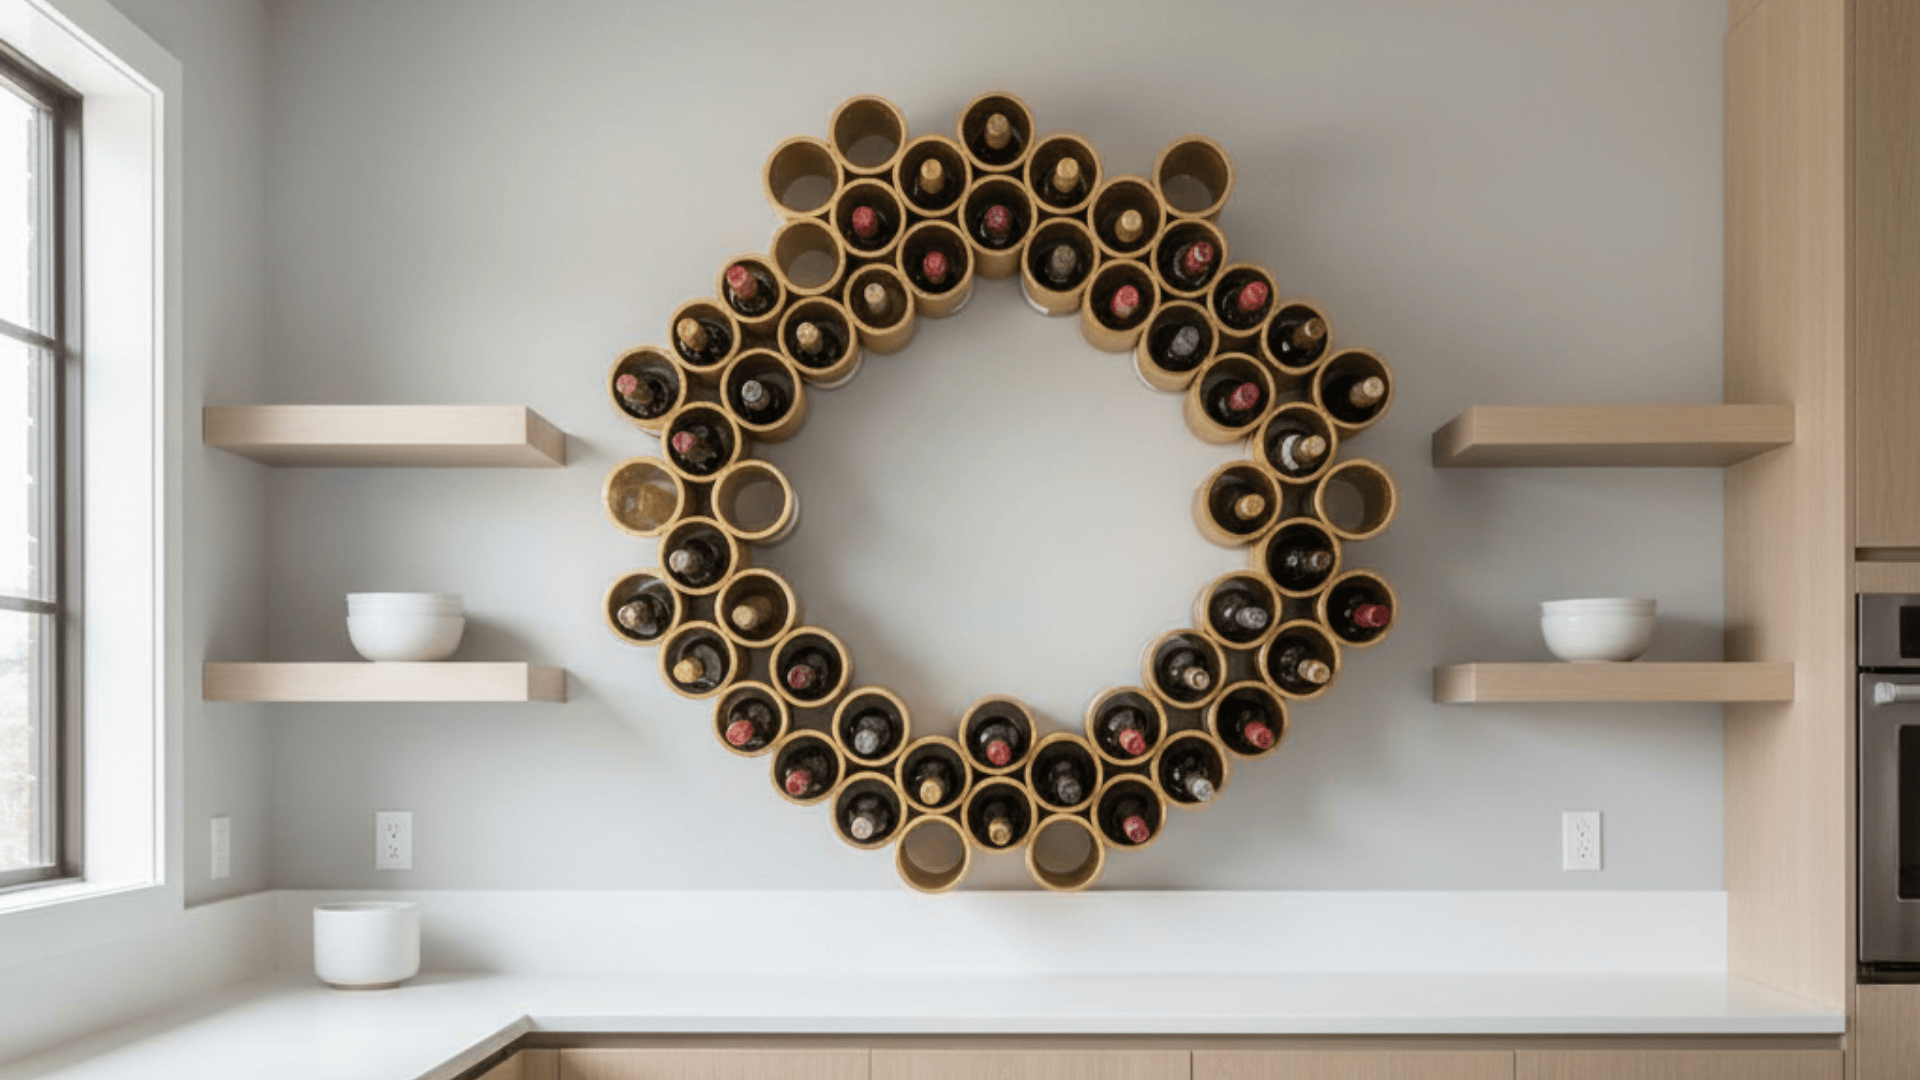
An innovative and budget-friendly approach using PVC pipes creates a modern, modular storage system. This diy wine cellar solution works great for basement or pantry organization.
- Tools and Materials: PVC pipe cutter, sandpaper, measuring tape, marker, PVC pipes (4-6 inch diameter), PVC cement, spray paint, and rubber feet or felt pads
- Steps to Follow: Measure, cut pipes into equal sections, and smooth edges with sandpaper, then arrange pipes in a honeycomb pattern and secure with cement if desired. Spray paint in the preferred color and add protective feet to prevent scratching
- Styling Tip: Use metallic spray paint like copper or gold to give the industrial PVC pipes a sophisticated, contemporary look that complements modern decor
- Skill Level: Beginner
5. Modular Stackable Wine Racks
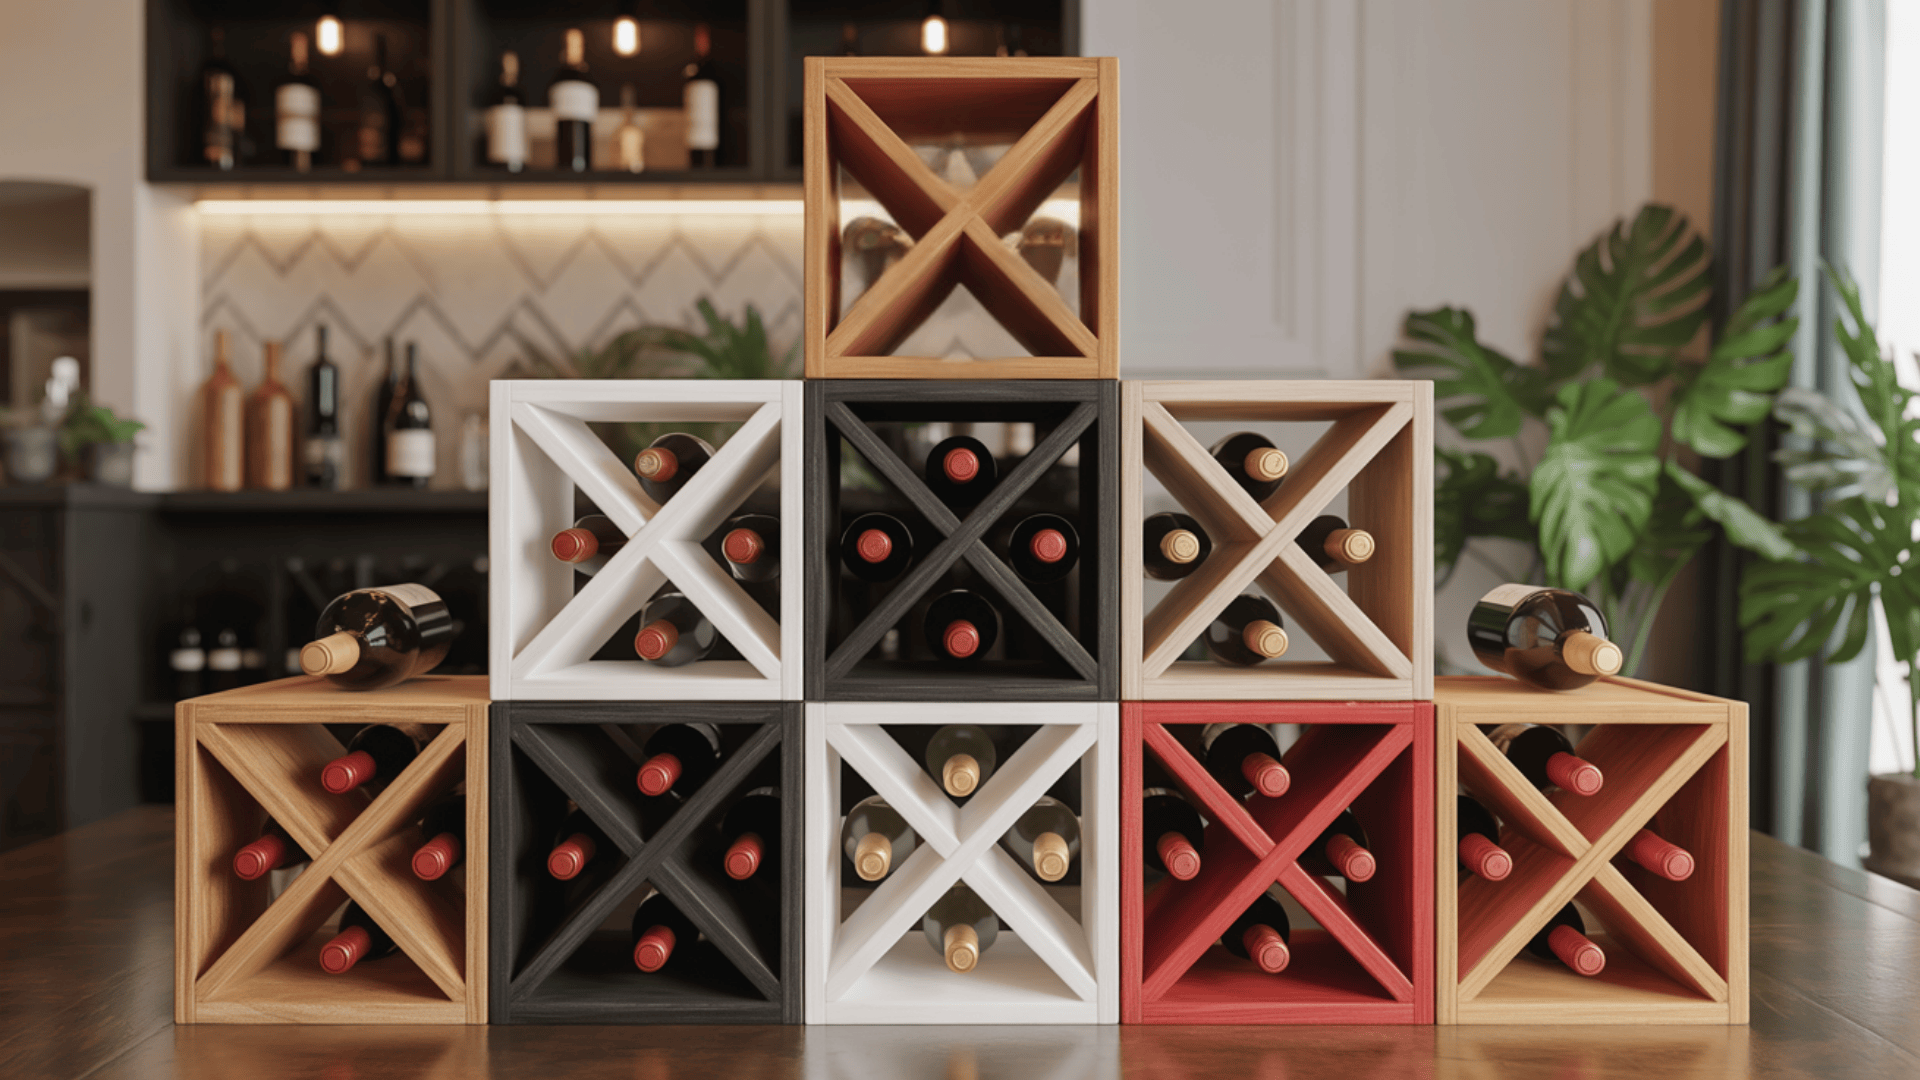
Flexible stackable units let you expand your collection as it grows. These interlocking pieces work perfectly for wine cellar construction, adapting to any space configuration without permanent installation.
- Tools and Materials: Miter saw, drill with countersink bit, wood glue, finishing nails, plywood sheets, corner brackets, sandpaper, and wood stain or paint
- Steps to Follow: Cut identical box frames with X-shaped dividers, then assemble with glue and nails. Sand all edges smooth, apply your preferred finish evenly, then stack units in your desired configuration and secure with corner brackets.
- Styling Tip: Create visual interest by alternating stained and painted modules, or arrange them in a stepped pyramid formation for dramatic effect
- Skill Level: Intermediate
6. Barnhouse Cellar
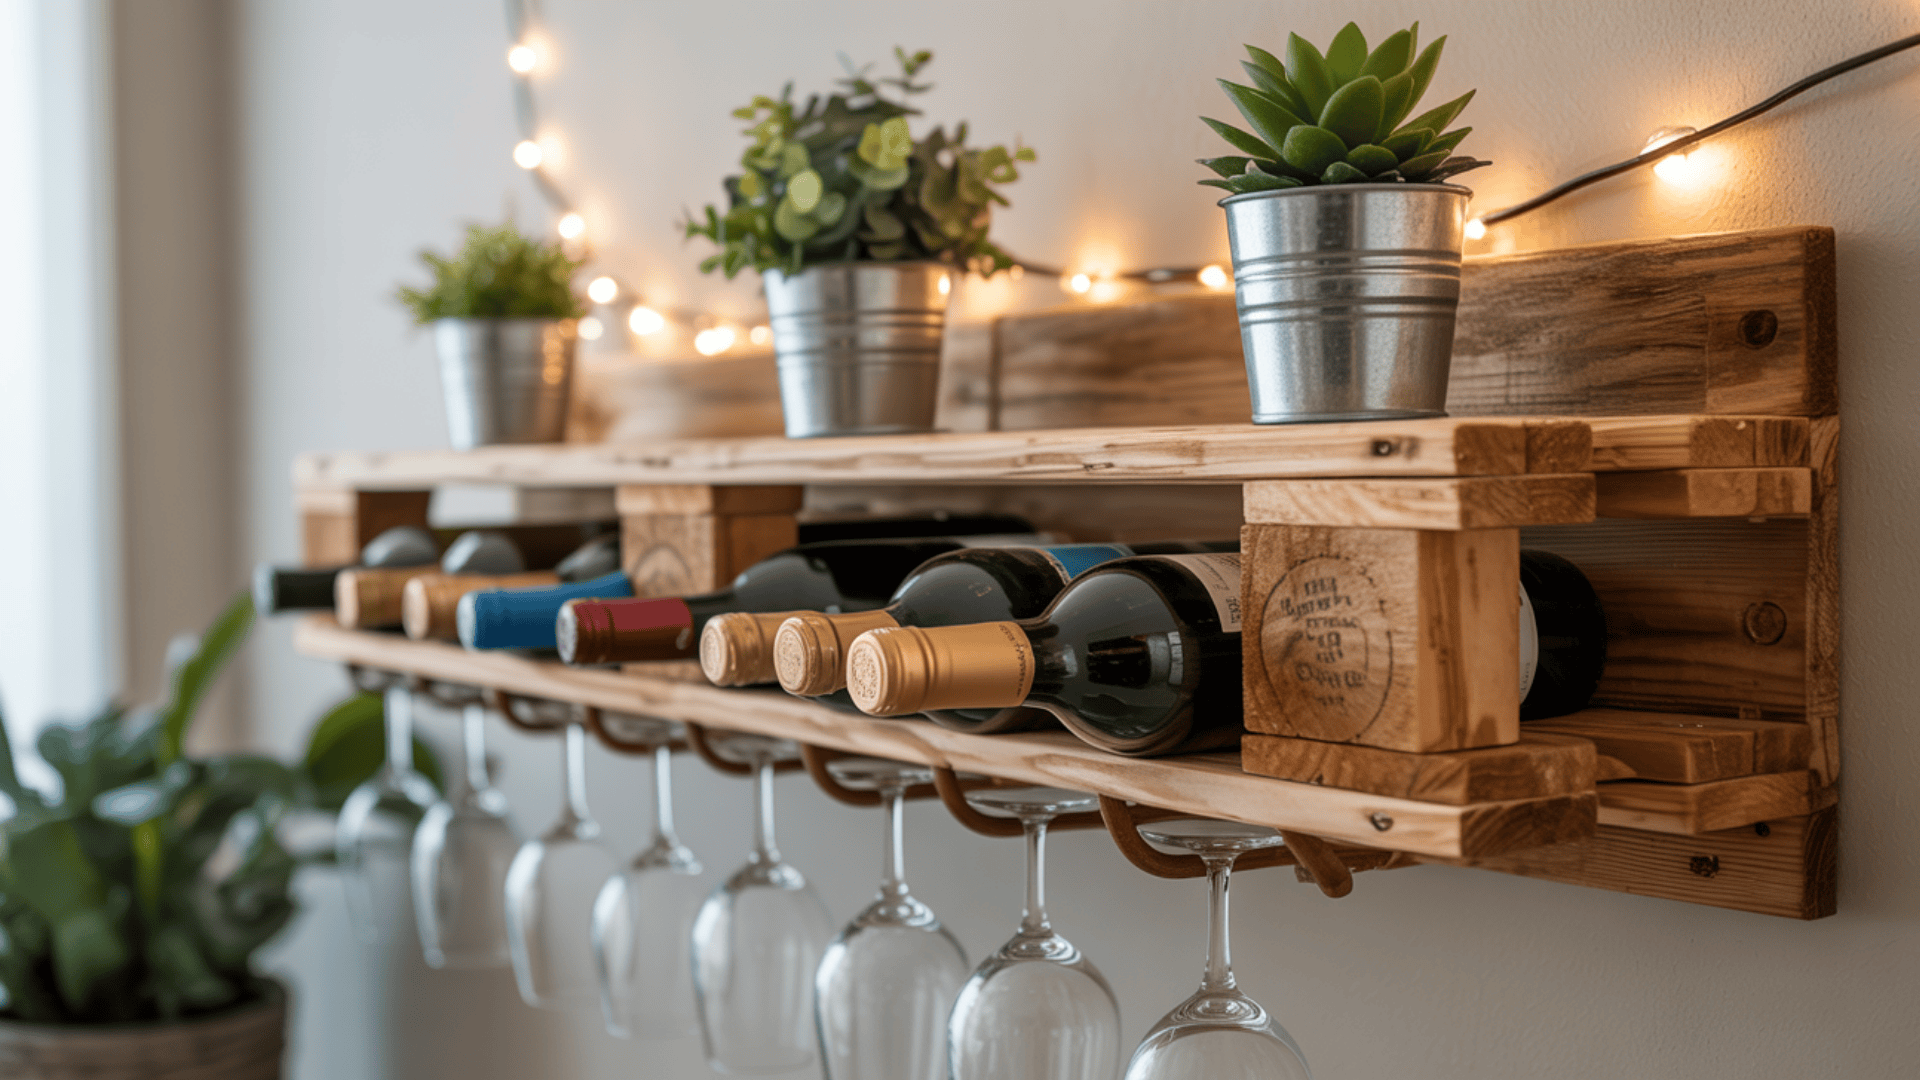
Reclaimed wooden pallets bring farmhouse charm to your wine storage while keeping costs minimal. This eco-friendly diy wine rack project changes discarded materials into functional decor.
- Tools and Materials: Pry bar or hammer, hand saw, sandpaper or sander, reclaimed wooden pallet, wood screws, wall brackets, and clear wood sealer
- Steps to Follow: Disassemble the pallet carefully and sand all boards to remove splinters and rough spots, then reassemble the boards into a rack shape with horizontal bottle supports. Seal wood with a protective coating and mount securely to the wall.
- Styling Tip: Leave the weathered wood finish natural for authentic rustic appeal, or whitewash it for a lighter, coastal-inspired look that brightens your space
- Skill Level: Beginner
7. Velvet Pour Drawer
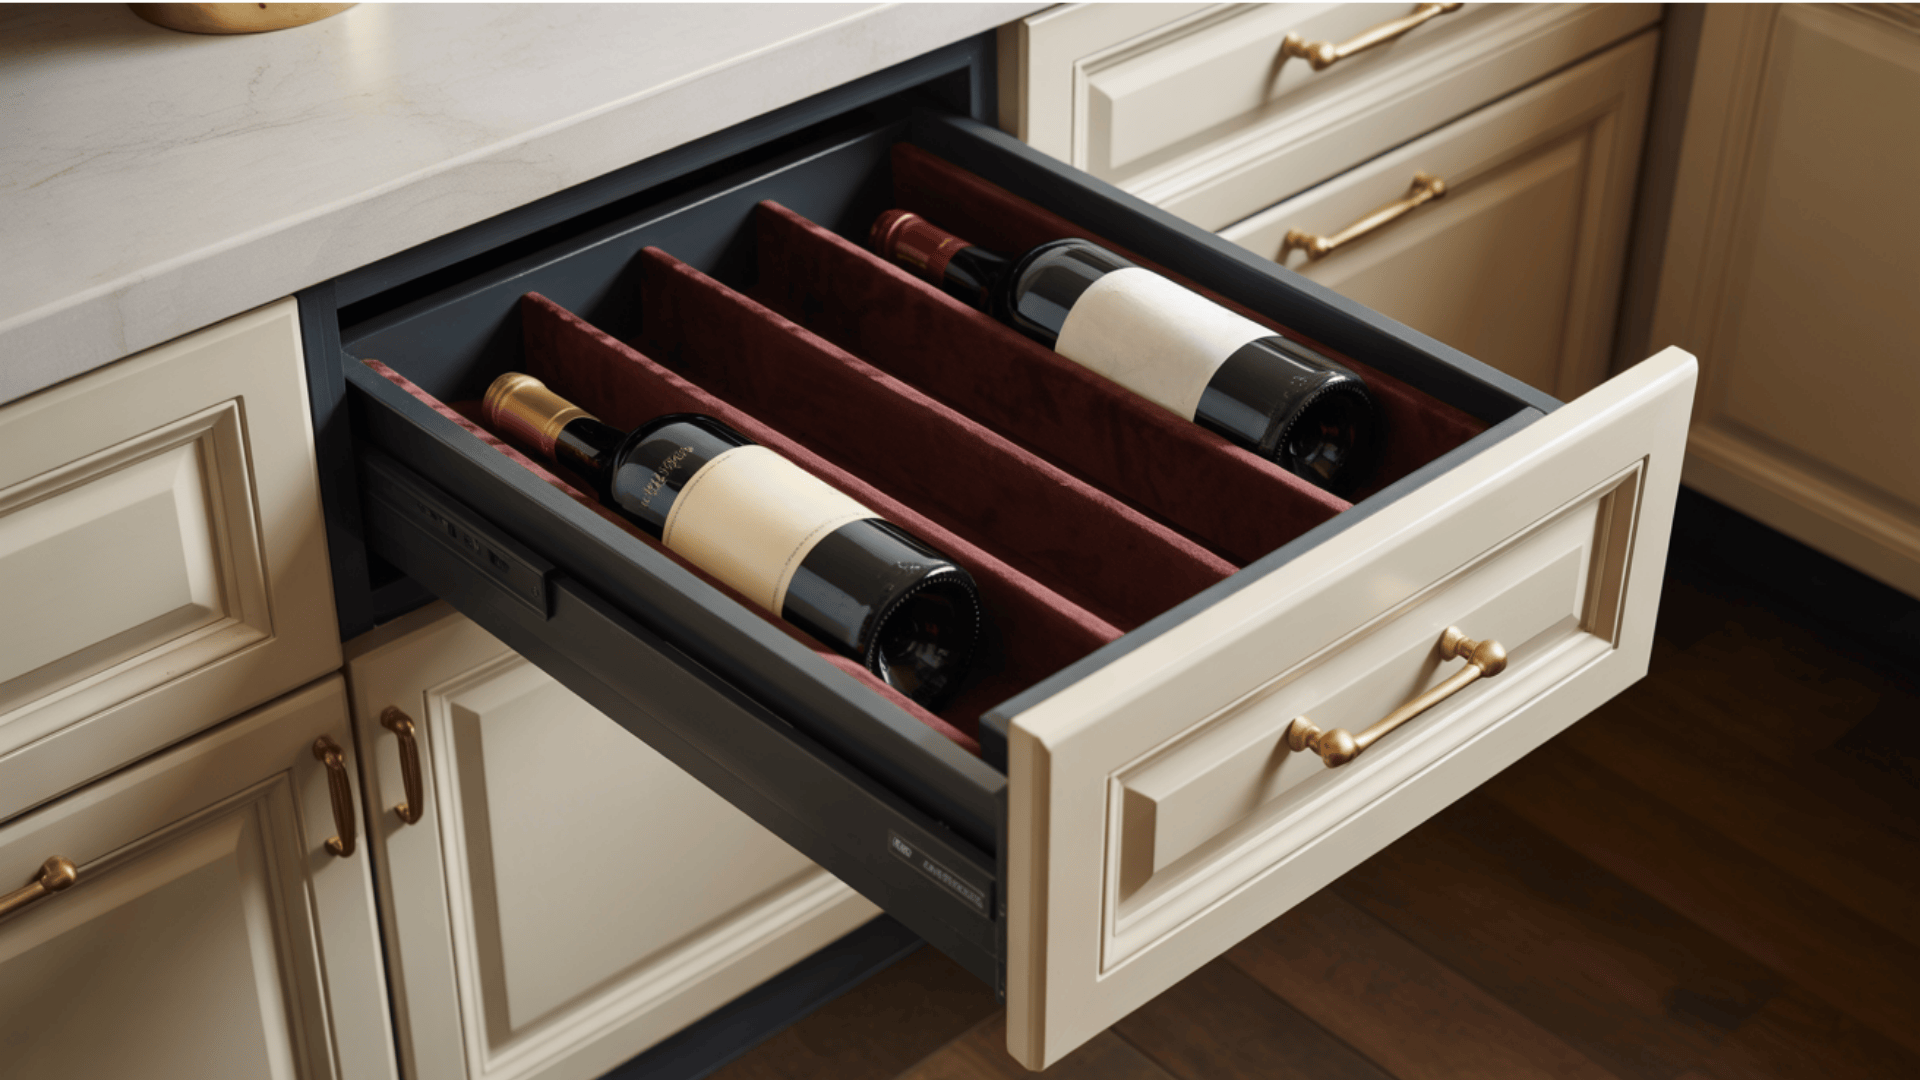
Convert existing drawers into dedicated wine storage with custom dividers and padding. This hidden storage approach keeps bottles protected while maintaining a clean, organized appearance.
- Tools and Materials: Measuring tape, utility knife, foam board or cardboard, fabric or felt lining, hot glue gun, scissors, and non-slip drawer liner
- Steps to Follow: Measure drawer dimensions and cut foam dividers to create individual bottle compartments. Line the drawer bottom with non-slip material, secure the dividers with hot glue, and add fabric lining to the dividers for extra protection and a polished look.
- Styling Tip: Use velvet or suede fabric in rich jewel tones for drawer lining to add a luxurious touch that makes opening the drawer feel special
- Skill Level: Beginner
These simple diy wine rack projects prove you don’t need advanced skills or expensive materials to create functional storage.
Common Mistakes to Avoid
Even the best diy wine rack plans can go wrong without proper attention to detail. Learning from common errors saves you time, materials, and frustration during your build.
- Wine bottles are heavier than they look. Always use hardware and wall anchors rated for at least double your estimated load to prevent failures.
- Measure your bottles before cutting materials since wine bottles vary in size. Standard bottles need 3-4 inches of space, while champagne bottles require more space.
- Moisture from temperature changes can warp unfinished wood. Always seal lumber with appropriate finishes, especially for wine cellar construction projects where humidity fluctuates.
- Bottles stored completely horizontal may leak, while upright storage dries out corks. Angle bottles slightly downward (5-15 degrees) to keep corks moist.
- Placing your diy wine cellar storage too high or deep makes retrieving bottles difficult. Position the racks at a comfortable reach height with sufficient clearance.
Simple Upkeep for DIY Wine Racks
Your diy wine rack needs regular care to keep bottles safe and looking great. Simple maintenance prevents wood damage, ensures stability, and protects your wine collection from environmental issues.
- Regular dusting: Wipe down your rack monthly with a soft, dry cloth to prevent dust buildup that can scratch finishes or transfer to bottles.
- Check stability: Inspect mounting hardware, screws, and joints quarterly to ensure nothing has loosened. Tighten any hardware immediately to prevent accidents.
- Monitor humidity: Keep the wine cellar construction areas between 50% and 70% humidity. Use a hygrometer to track levels and prevent cork drying or mold growth.
- Refinish surfaces: Reapply wood sealer or varnish every 1-2 years, especially in kitchens where grease and moisture can degrade protective coatings.
- Rotate bottles: Turn them quarterly when storing for long-term use to prevent sediment from settling permanently and keep corks evenly moistened on all sides.
- Inspect for damage: Look for cracks, warping, or weak spots during cleaning sessions. Address small issues before they compromise your entire wine cellar storage system.
It’s a Wrap
Building a diy wine rack changes how you store and showcase your collection. You’ve learned multiple project options, from simple wall mounts to modular systems that grow with your needs.
Remember to measure carefully, use proper hardware for weight support, and maintain your rack regularly for lasting performance.
You can create something unique that perfectly fits your space and style preferences. Ready to start building?
Grab your tools, pick your favorite design, and spend this weekend crafting custom wine storage that impresses guests and protects your bottles for years ahead.